Alipay Developer Center user guide
The Alipay Developer Center helps you integrate with Antom products. This section provides information about how to use the Alipay Developer Center to perform the self-integration process. Contact AlipayGlobalTechService@service.alipay.com if you face issues with logging in.
Integration process
Integration with Antom products via Alipay Developer Center consists of the following steps:
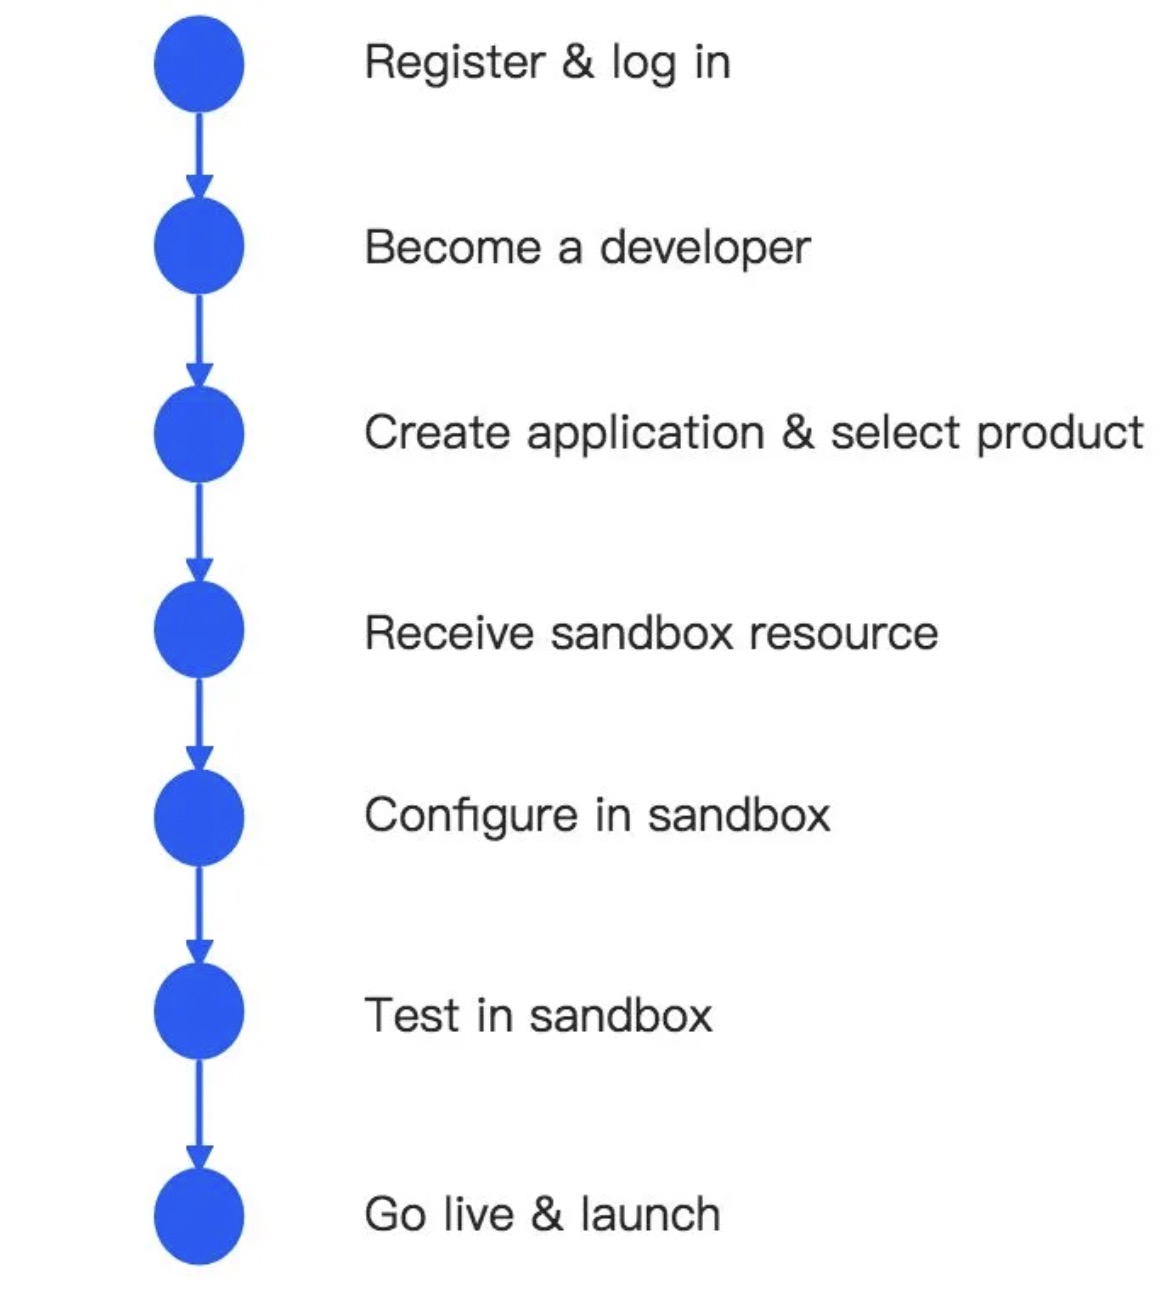
Figure 1. Integration process
Step 1: Register & log in
Register on the Alipay portal to become an Antom business partner, and get your Antom account to log in to the Alipay Developer Center to start your integration process.
Note: The account for logging in to the Alipay Developer Center needs to be the same account as the one used in the signed Antom contract.
Step 2: Become a developer
After you log in to the Alipay Developer Center, read and agree to Alipay Developer Terms of Use. Then specify your role to set the integration mode.
Types of roles:
- Merchant:
Choose this if you are a merchant that is making the integration for your company in-house.
- Acquirer:
Choose this if you are an acquirer that is making the integration for your company in-house. An acquirer is an institution that processes payments on behalf of Merchants.
- System Integrator or Independent Software Vendor:
Choose this if you are a merchant who is outsourcing the integration to a system integrator.
Choose this if you are an ISV that has signed a contract with Antom to provide integration services for merchants.
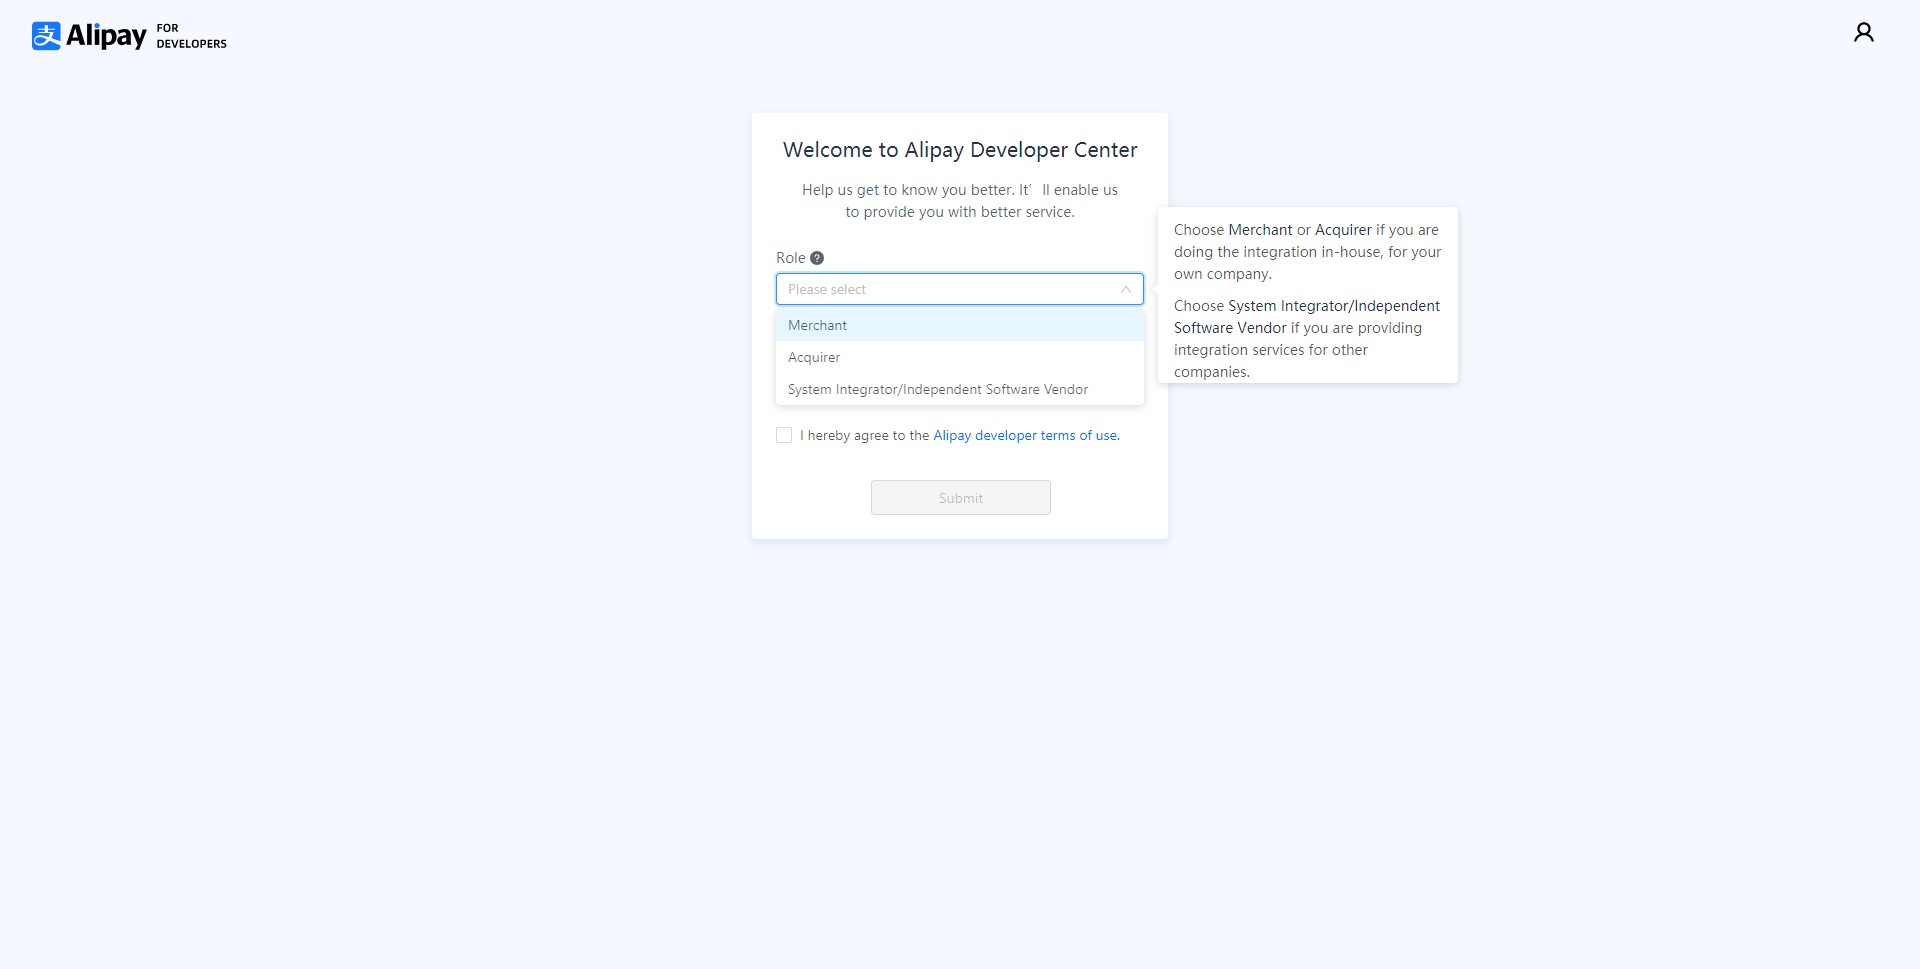
Figure 2. Specify the role
After you select the role, select one of the listed countries/regions to indicate the business registration country/region. Please choose carefully as the business registration country/region determines Antom integration settings, and this cannot be changed later in the integration process. For example, choose Singapore if you are an ISV in Singapore.
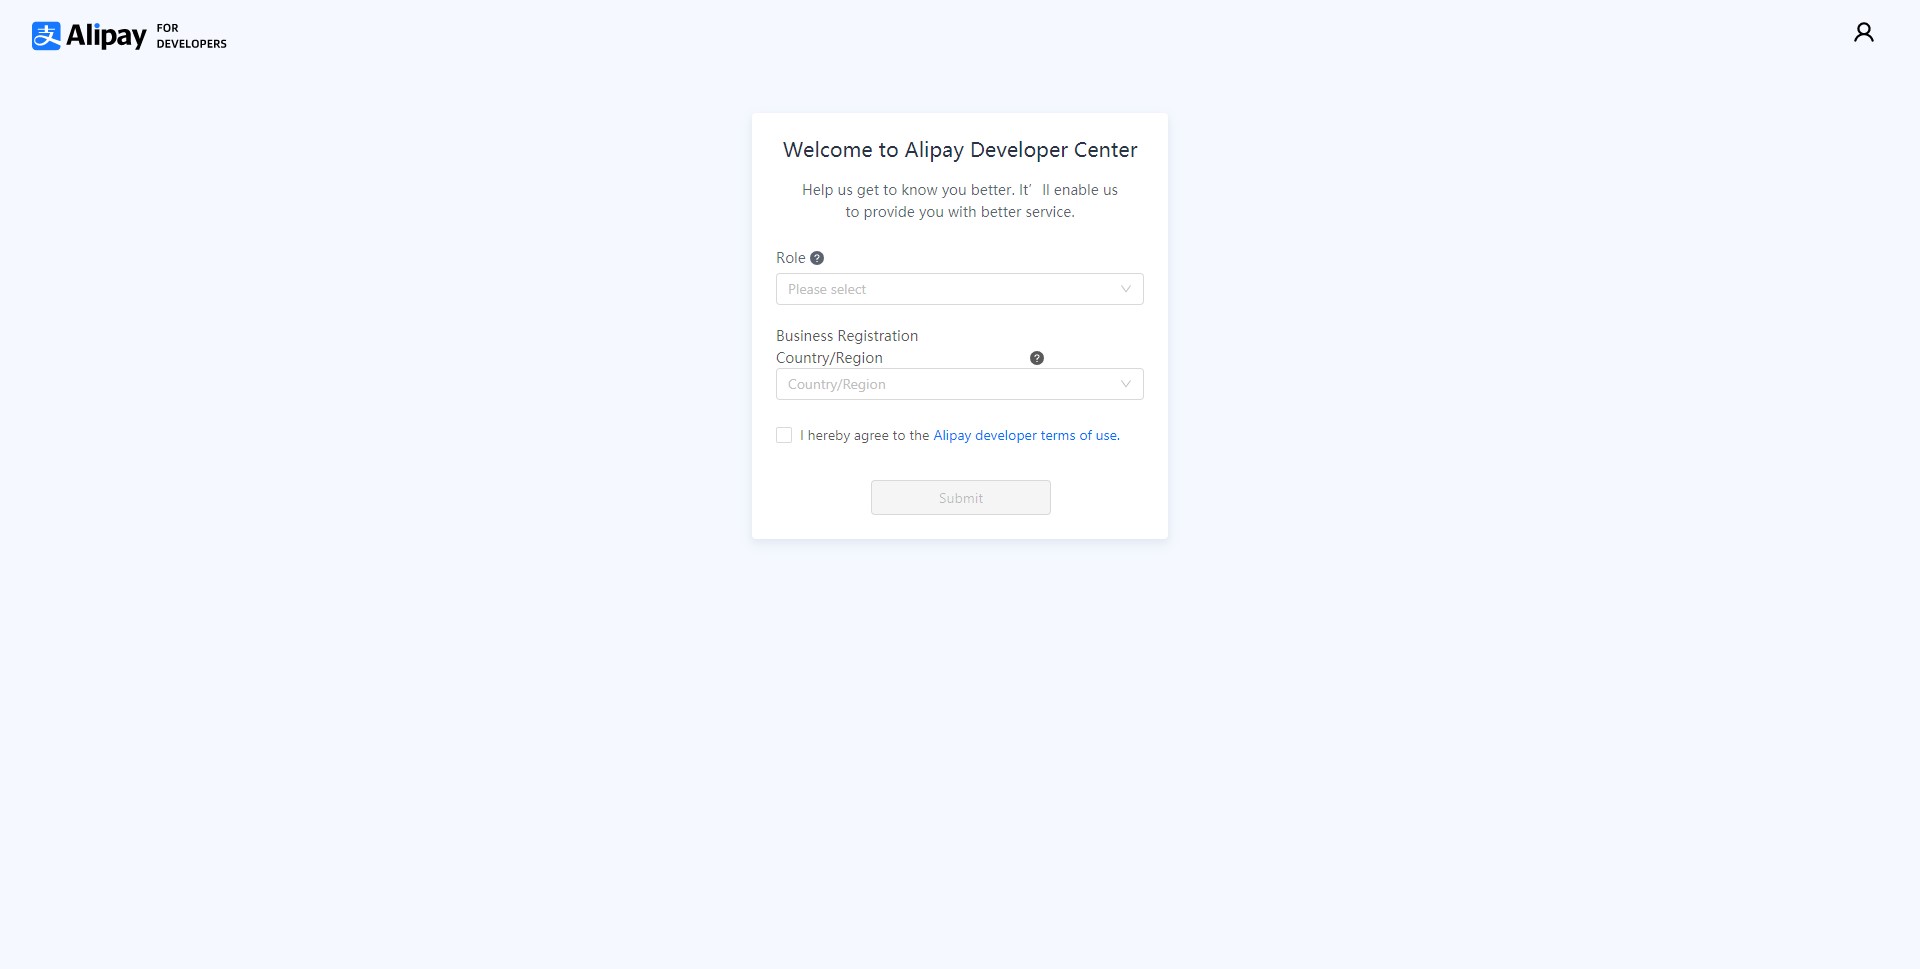
Figure 3. Specify the business registration country/region
Once you have completed the above steps and have successfully onboarded as an Alipay developer, read the Quick Start guide to quickly familiarize yourself with the upcoming steps and click Get Started to continue.
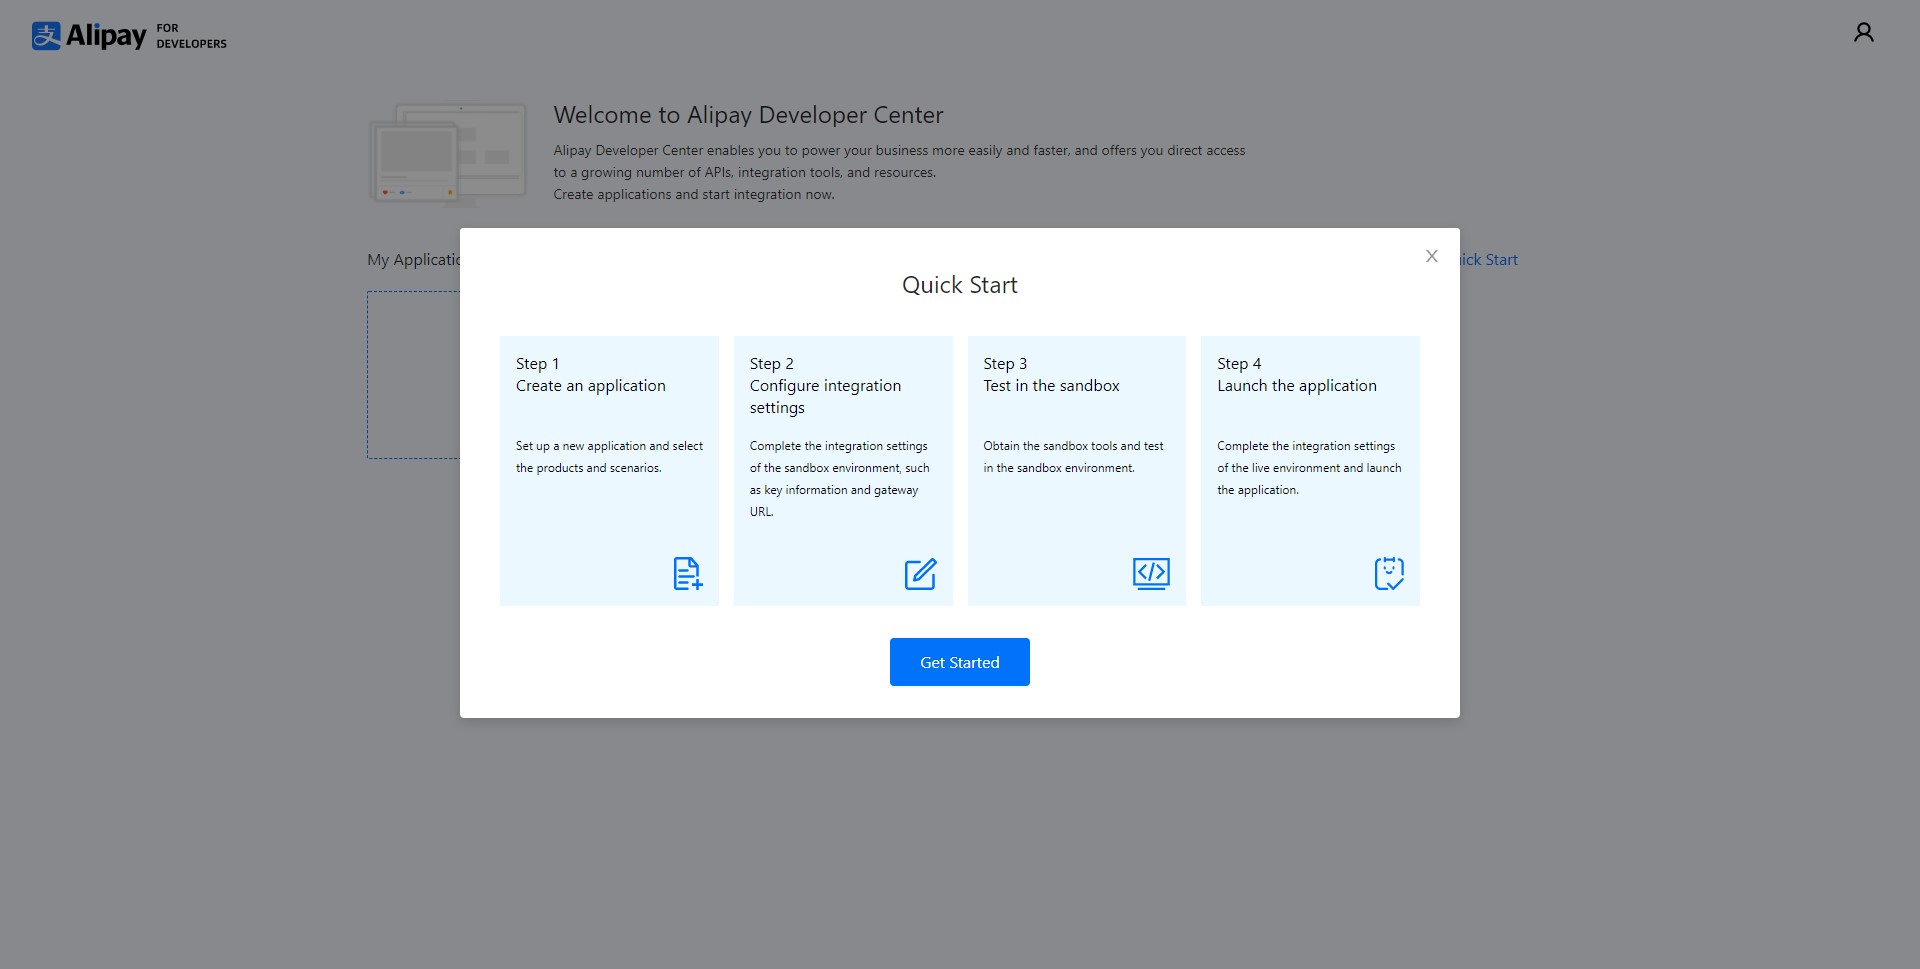
Figure 4. Quick start guide
Step 3: Create application & select product
Create an application on the home page of Alipay Developer Center and provide basic information about the application, such as the application name, application type, and application description.
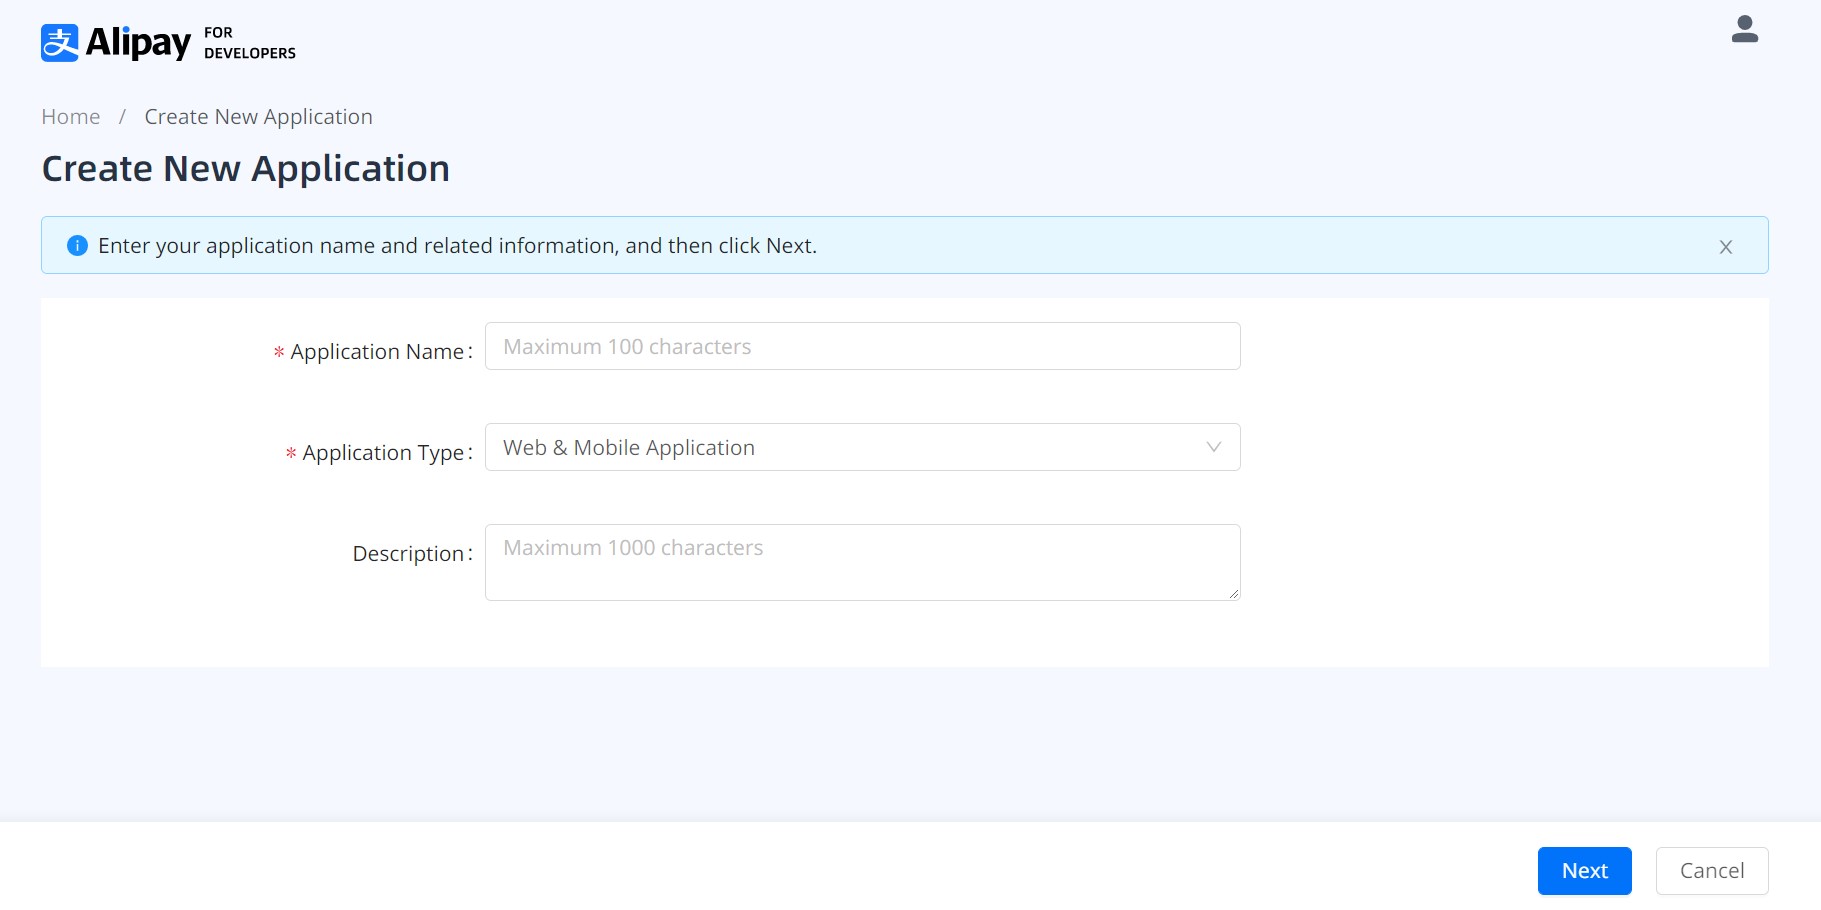
Figure 5. Enter application information
Select the product and scenarios to integrate with and specify the test currency. Each application supports only one product and one test currency. However, multiple scenarios of one product can be supported. If you want to integrate with more than one product, you need to create several applications.
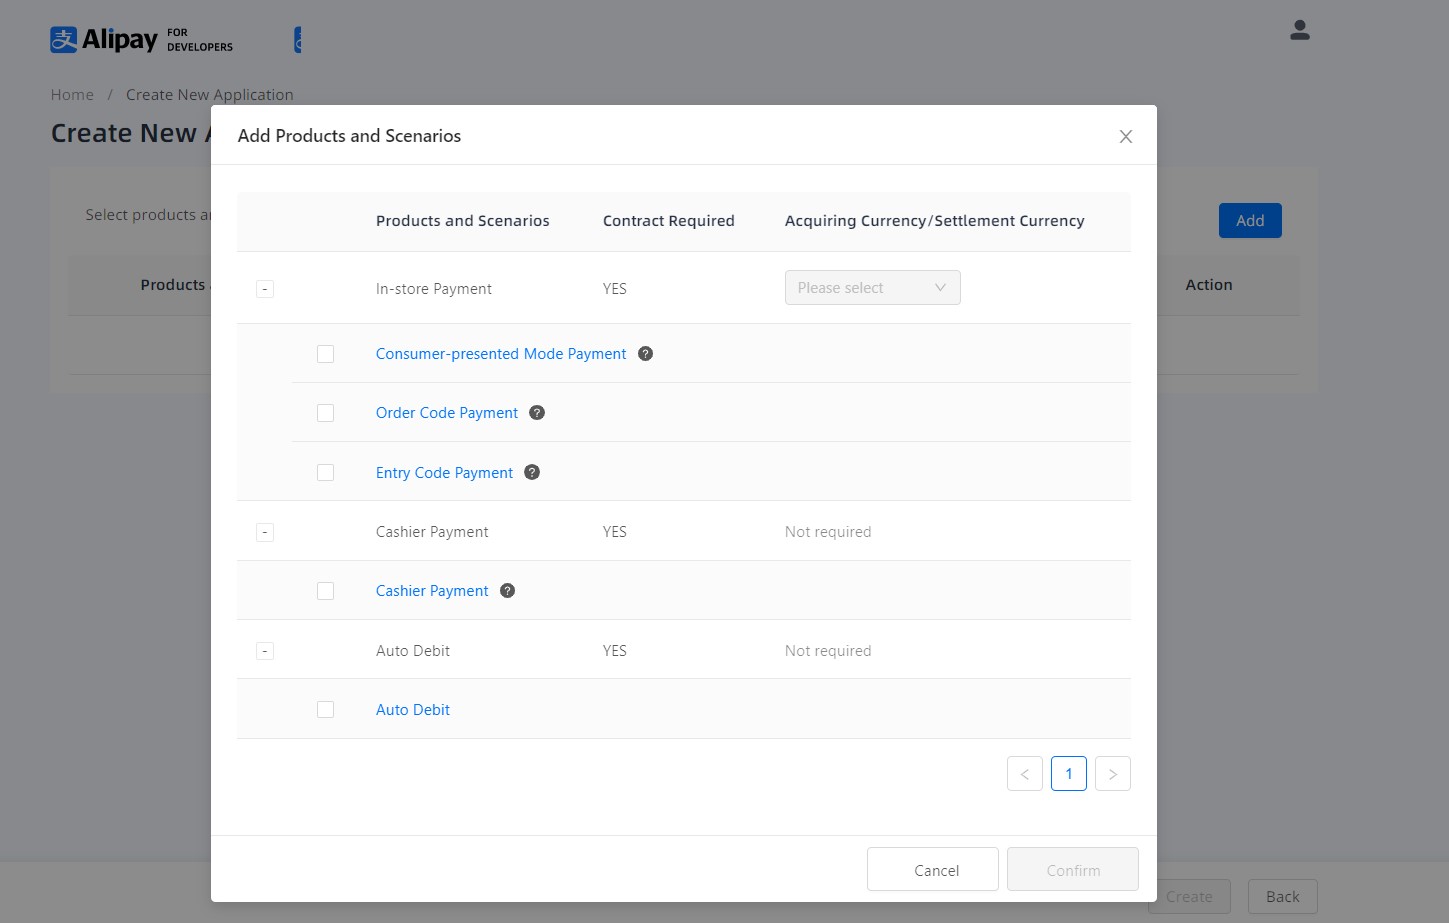
Figure 6. Select the product and scenarios
After creating the application, you can check your Client ID and other related information about the application on the Basic Information page:
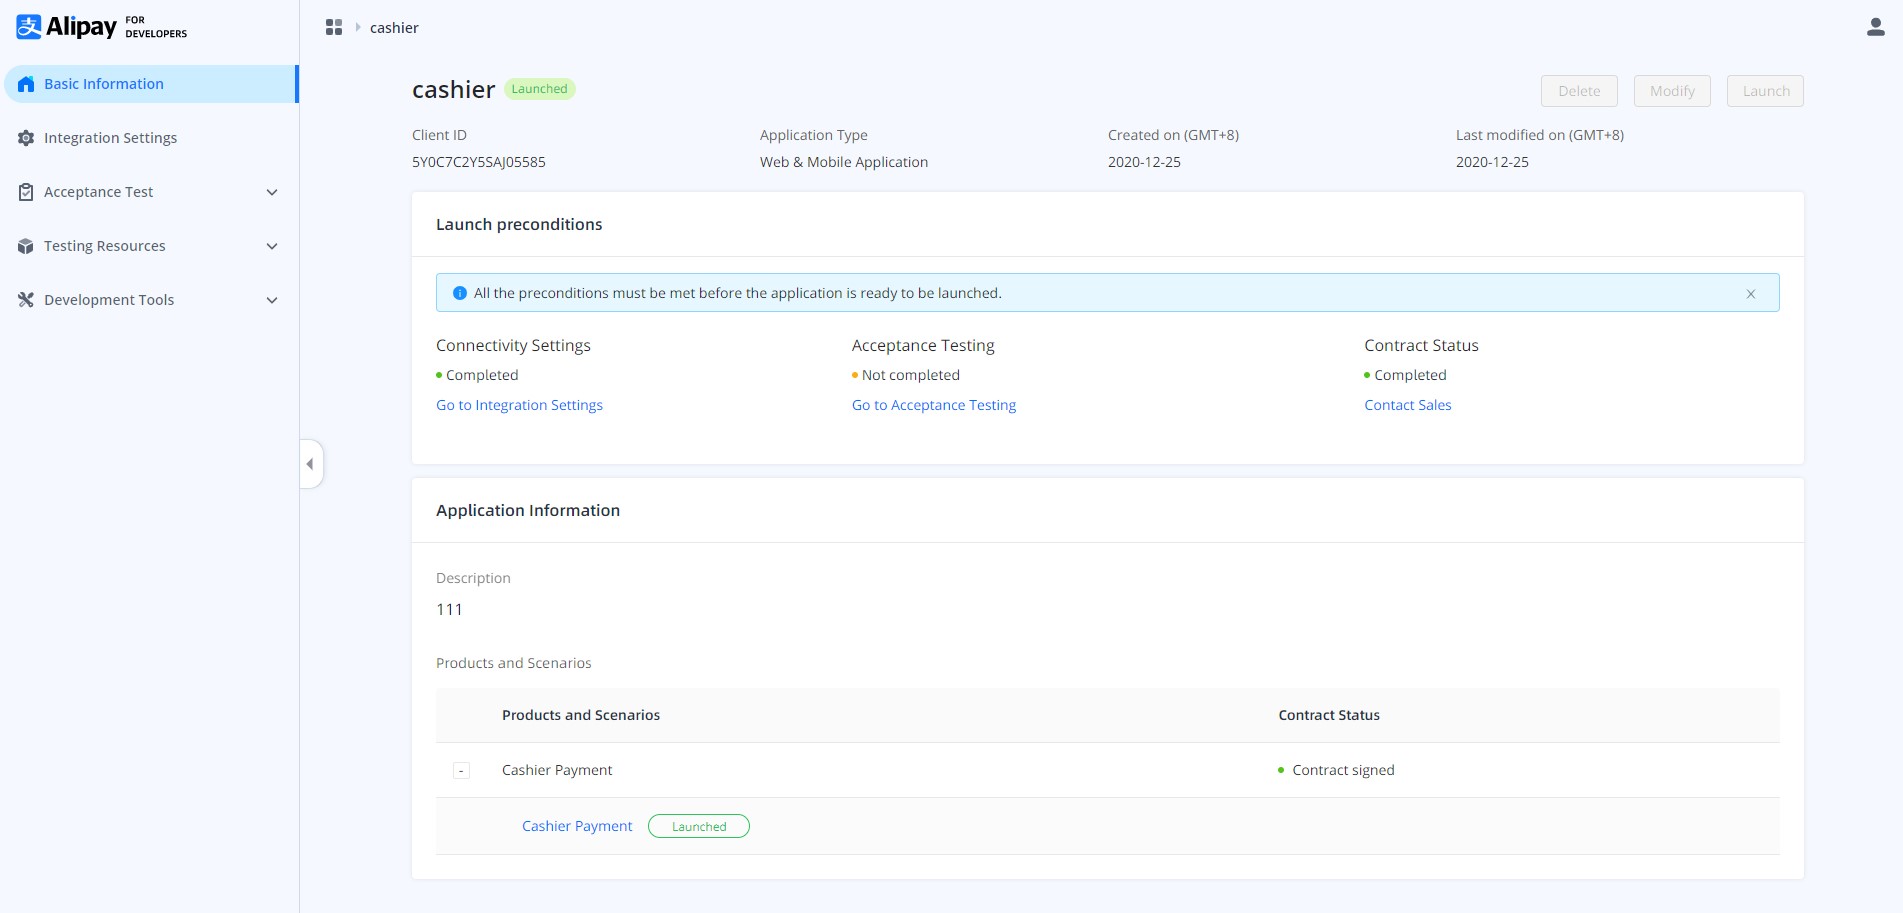
Figure 7. Check the application's basic information
You can also see all the created applications and their corresponding statuses on the home page of Alipay Developer Center.
Step 4: Receive sandbox resources
After creating the application and selecting the product, sandbox resources are automatically allocated to you. You can check the sandbox resources on the Sandbox page. Sandbox resources include:
- Sandbox Client ID
- Buyer account and password of the Alipay China wallet. You can top up the wallet's balance.
- Merchant account

Figure 8. Sandbox resources
For ISV, after creating the application, you can view your development information used in the production environment and the sandbox environment, such as gateway endpoint, client ID, test token, ISV client ID, ISV customer ID, and test merchant customer ID.
In sandbox integration, a testing merchant is provided to you to perform the needed integration with Antom API. Understand the following ID and token definitions before proceeding:
- ISV customer ID: The internal MID assigned for the ISV.
- Client ID: The client ID assigned for the ISV.
- Customer ID: The internal MID assigned for the test merchant.
- Test token: The corresponding authorization token for a test merchant, which is used in the sandbox.
- Authorization token: This is generated by Antom when the merchant authorizes you as an ISV. This token is used to identify the merchant when calling Antom API.

Figure 9. Sandbox resources for ISV
Step 5: Configure in sandbox
On the Integration Settings page, you can check your sandbox Client ID, configure sandbox keys, and set the gateway URL.
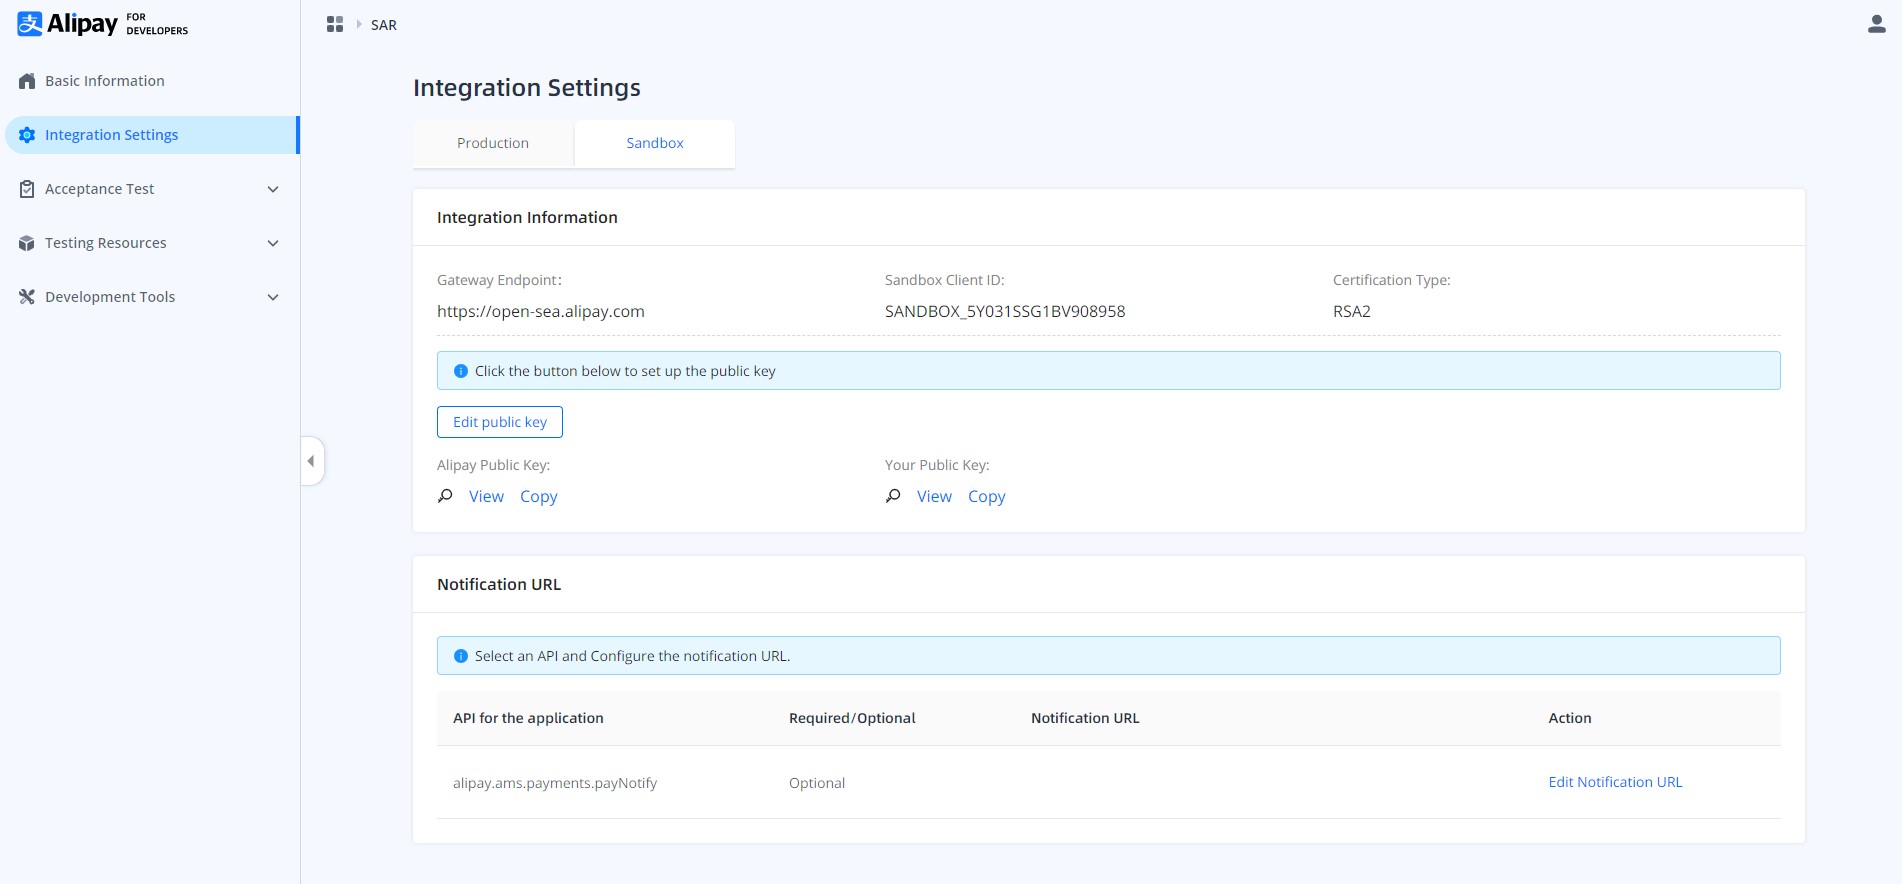
Figure 10. Integration Settings page
To make your integration safer, Antom uses asymmetric keys. You need to upload your public key on Alipay Developer Center to get the Antom public key.
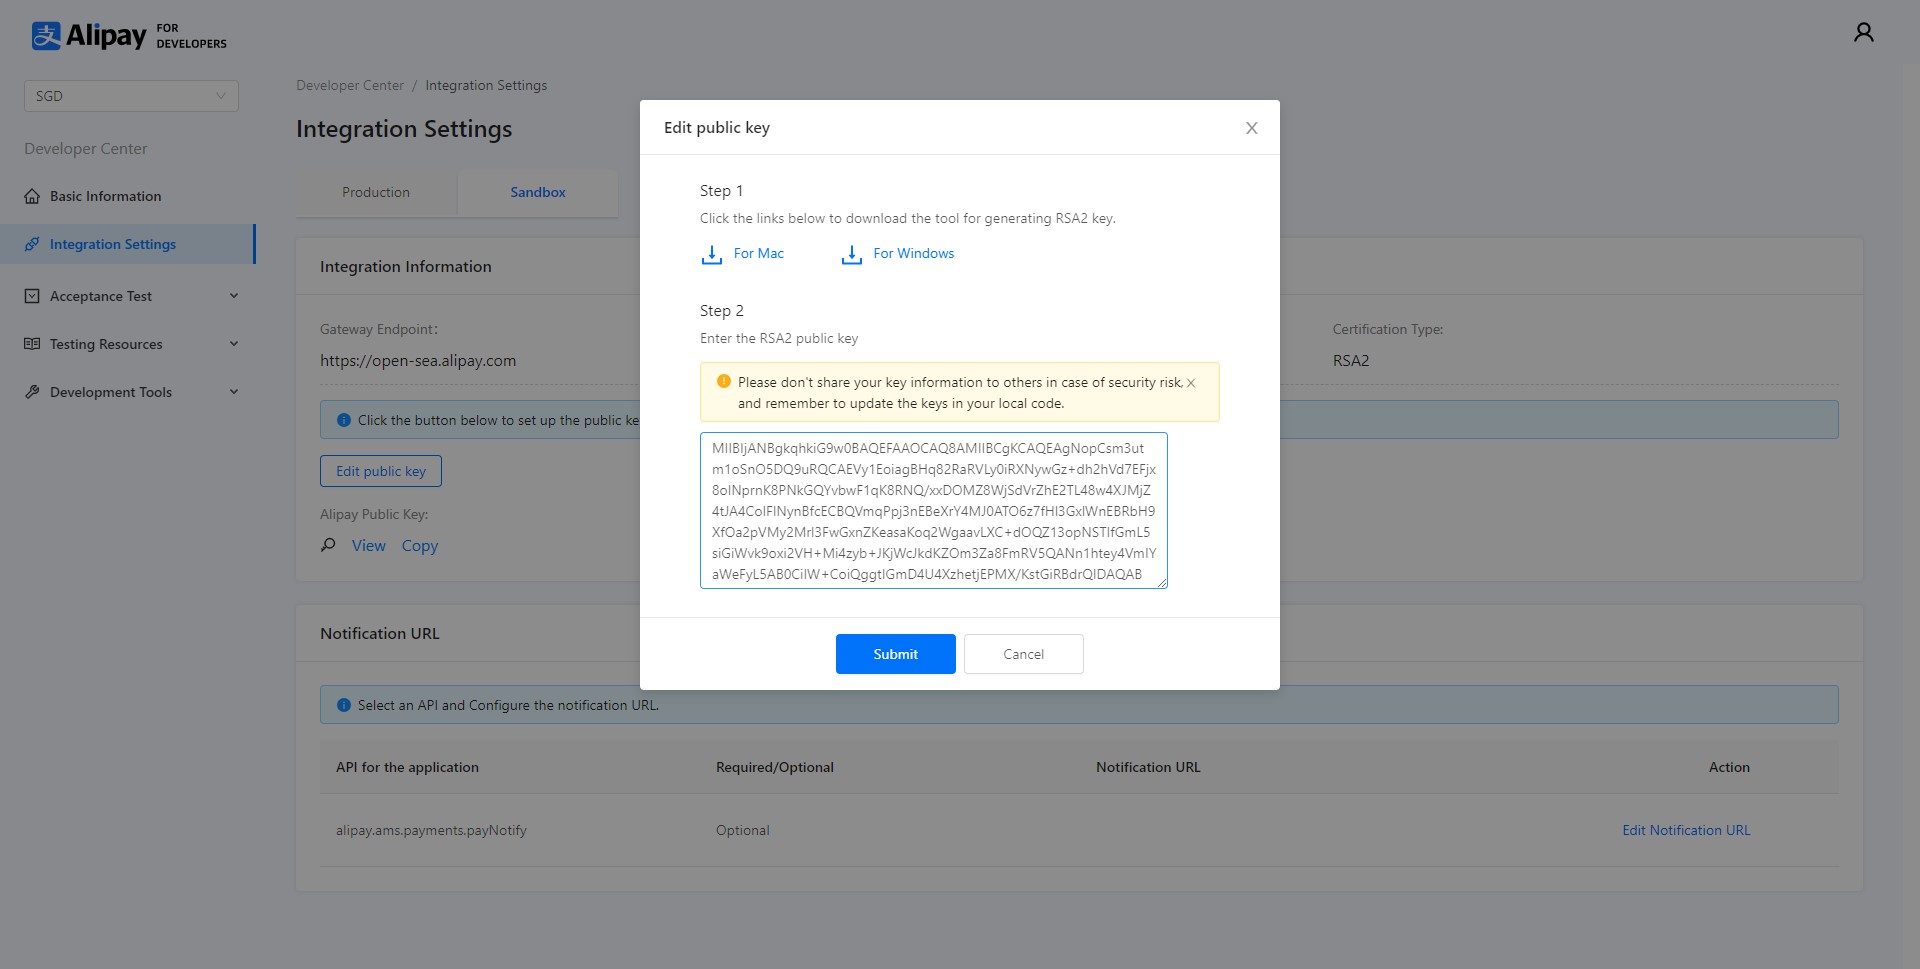
Figure 11. Set the public key
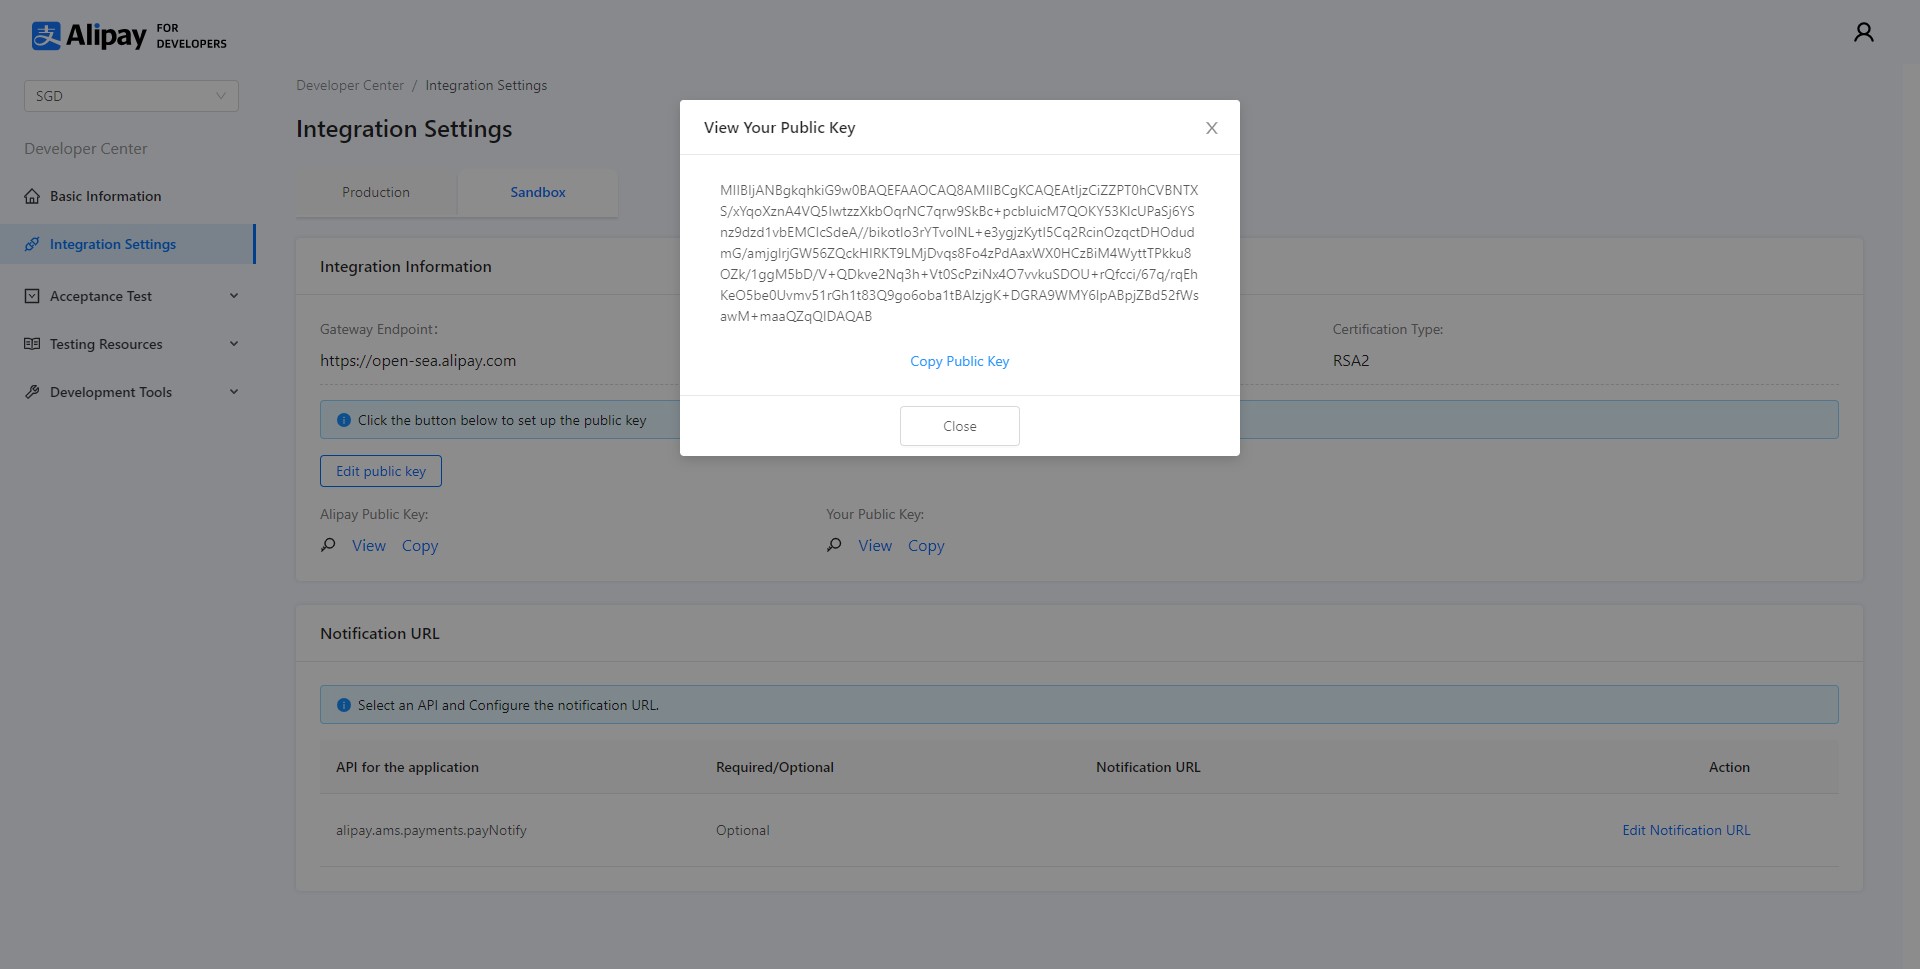
Figure 12. View the Antom public key
Step 6: Test in sandbox
After configuring in the sandbox environment, you need to develop and integrate with Antom services in the test environment. A production environment is simulated with the sandbox resources you obtained in step 4. Integrating with the test environment consists of the following parts:
- Calling APIs
- Processing reconciliation files
- Testing and acceptance
For more information, see Integration guide.
For the sandbox integration, the Agent-token should be set to the provided test token. During the sandbox integration, Antom generates the reconciliation files on behalf of the test merchant, not the ISV. We recommend that an ISV validates whether the reconciliation files created for the test merchant of the transactions are correct. See Reports and reconciliation for details.
Step 7: Go live & launch
Once you have completed tests in the sandbox and are ready to go live, you can enter the Integration Settings page, click on the Live tab, and make the following configurations:
- Get your production Client ID on the page.
- Set your public key and then get the Antom public key. The keys are to be used for signing the request and verifying the signature after the application rollout.
- Set the gateway URL for the production environment.
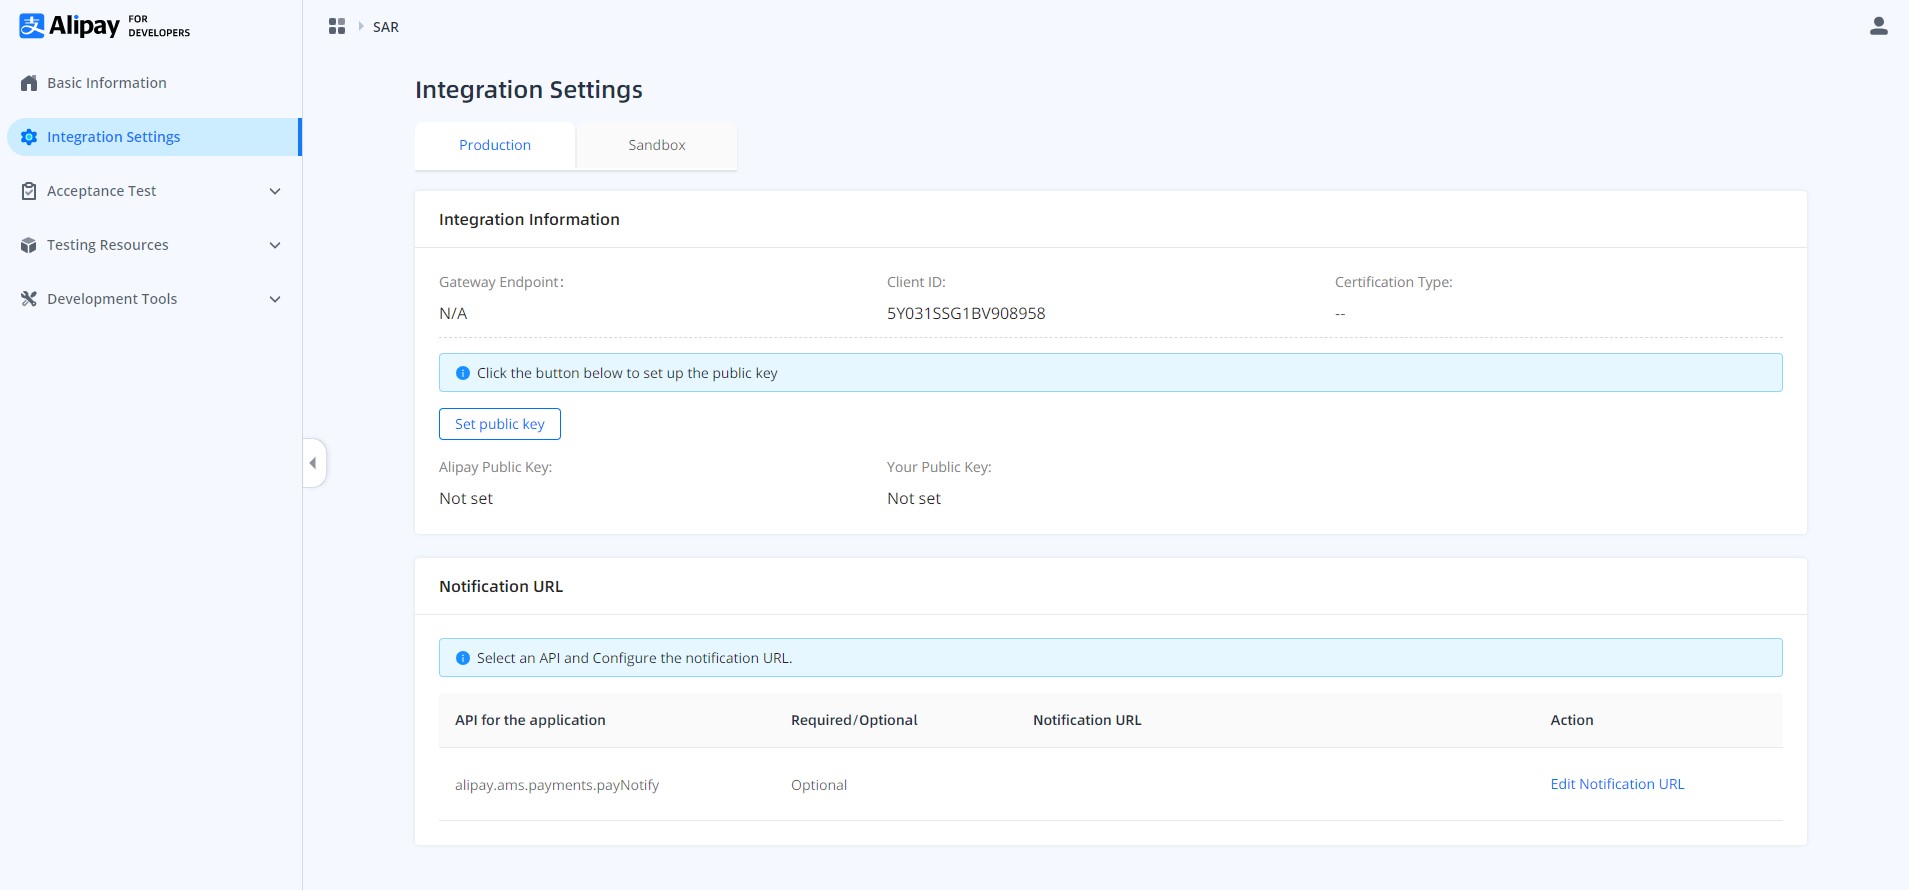
Figure 13. Configure the production environment
After configuring for the production environment, you can launch your application by clicking the Launch button.
As an ISV, in addition to following the integration guidelines, you need to set the Agent-Token header as described in the Alipay API specification for each API call with an authorization token. The token is necessary for Antom to identify the merchant you serve.
Note: You can only launch an application after you have signed the business contract with Antom. After the application has launched, email verification is needed if you need to modify configuration details such as the public key or notification URL.
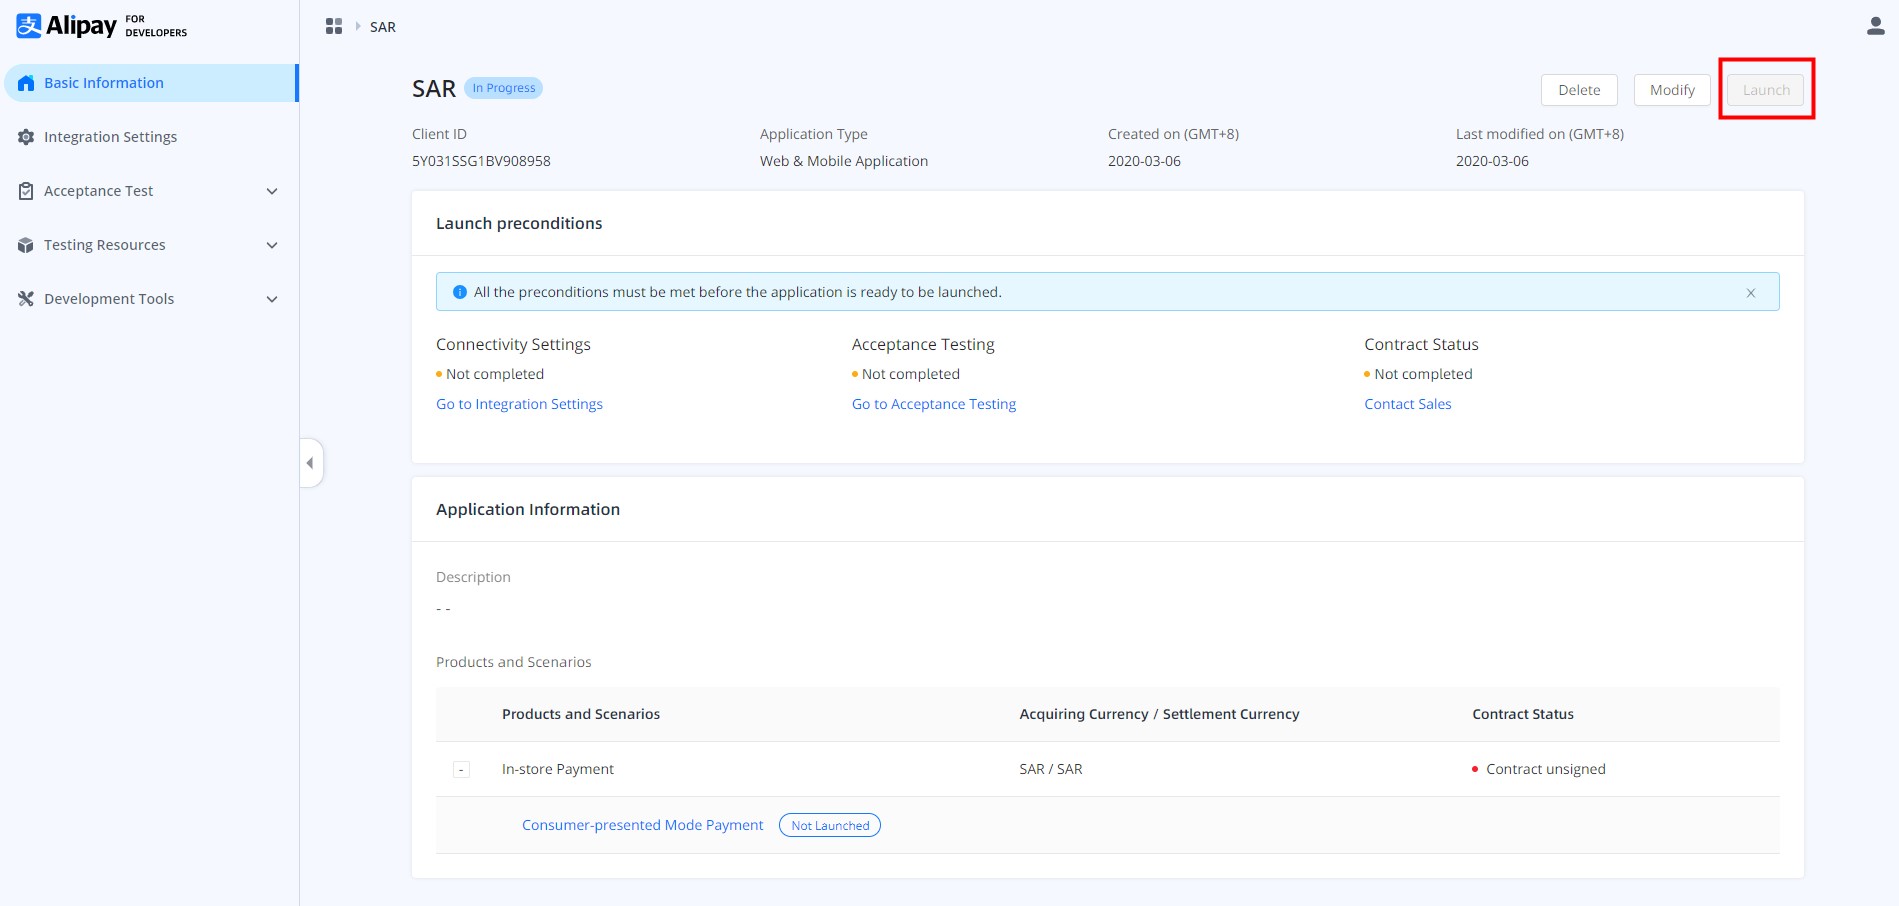
Figure 14. Launch the application
ISV integration
ISV needs further actions after completing all the above steps in integration.
Step 1: Share authorization URL with merchants
This step is only required for ISV. Once your application is launched to live, merchants can onboard. In Alipay Developer Center, you can manage existing authorized merchants under Application Authorization. You can generate your specific authorization URL by clicking Generate Authorization URL, and share it with merchants that authorize you as an ISV. This button is disabled if your application is not launched to live.
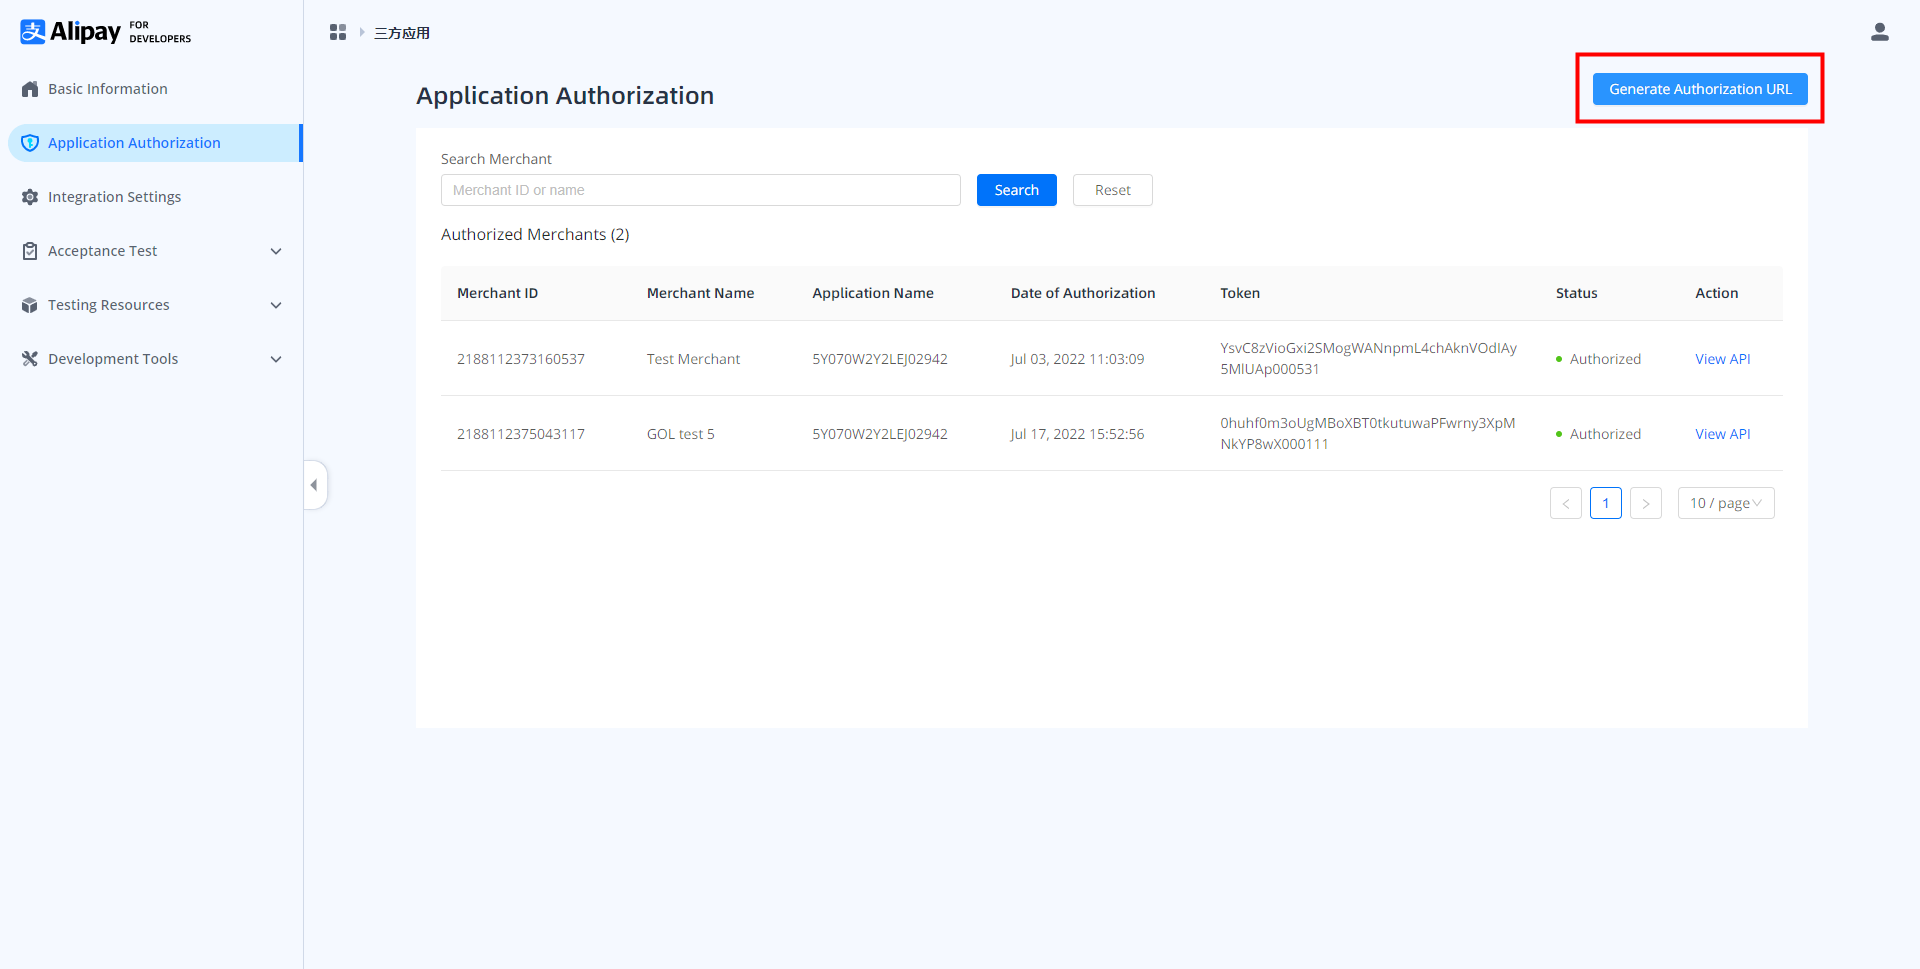
Figure 15. Generate authorization URL
Step 2: Be authorized by merchants
Merchants who use ISVs to integrate with Antom still need to onboarded with Antom through Antom's customer service agents via a similar back-office system.
Once the vetting is completed, merchants can visit the given authorization URL to authorize the ISV to perform integration on their behalf. This completes the setup among ISV, merchants, and Antom.
Merchants can use the same registration email provided during the vetting process as the account. If it is the merchant's first login, click Forget password to set up the password and log in.
Step 3: Obtain the authorization token
After merchants complete the authorization, you can view the authorization token under Application Authorization in Alipay Developer Center.
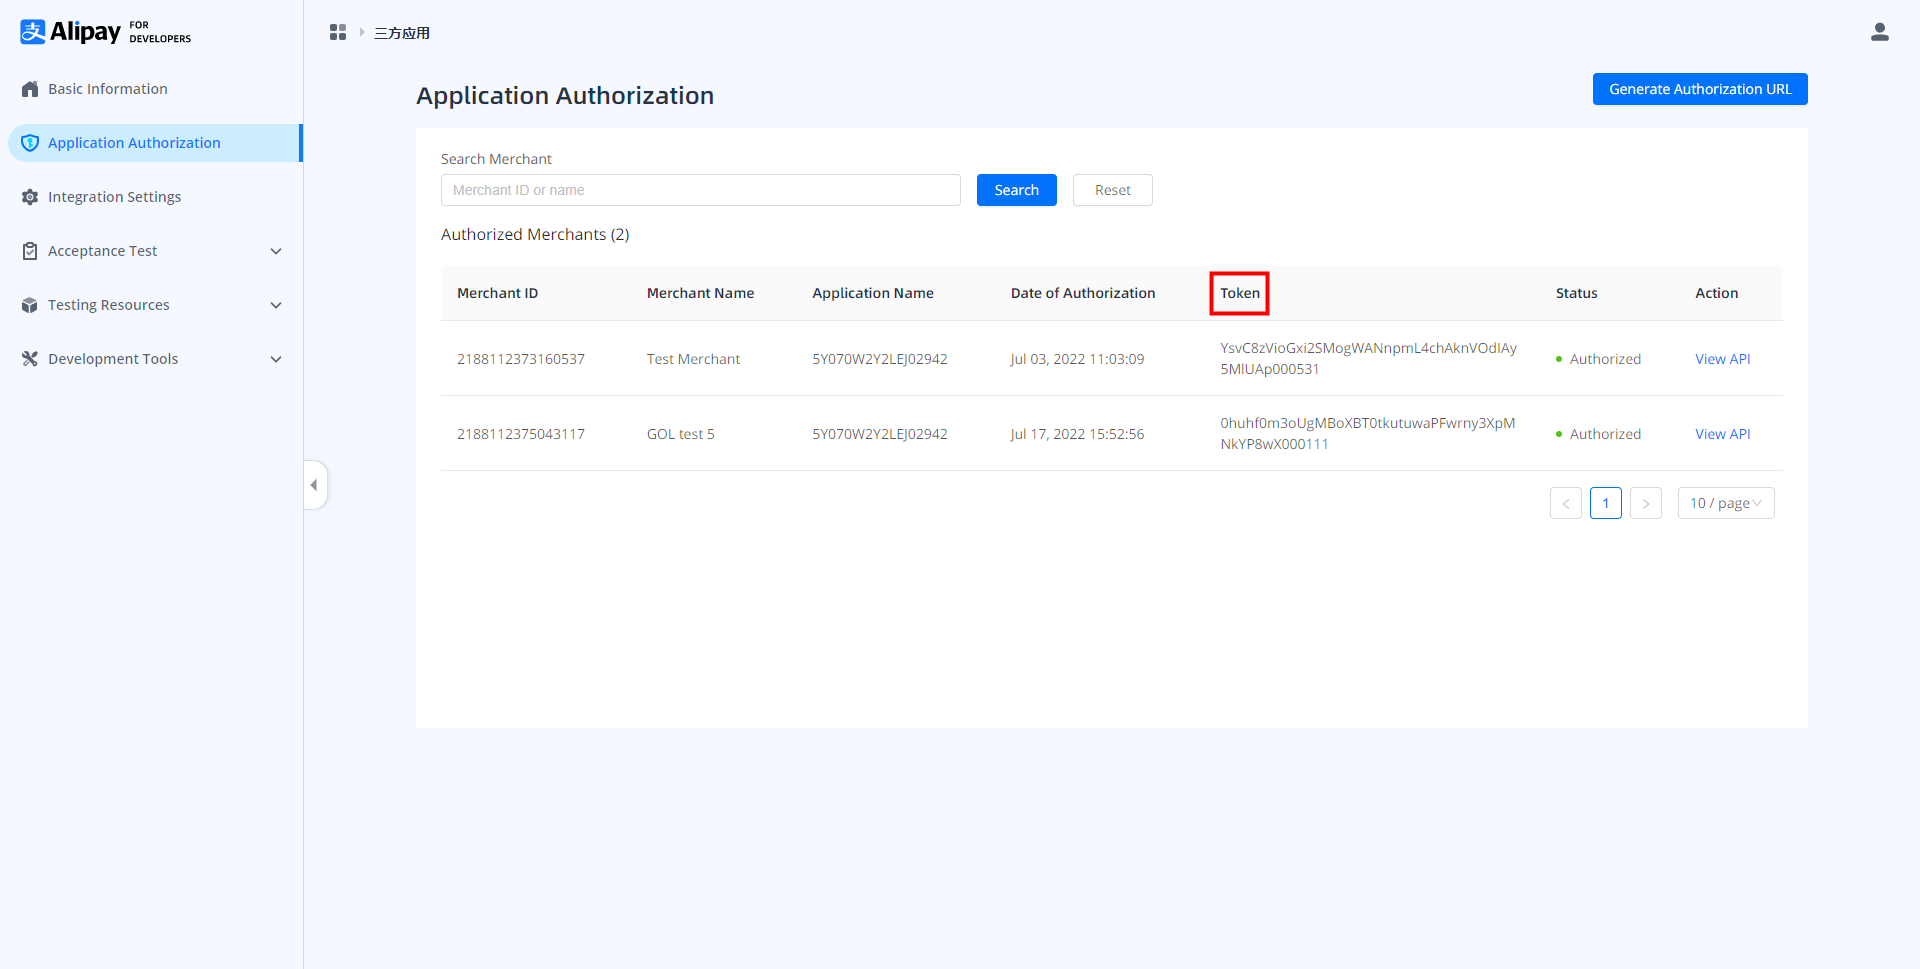
Figure 16. Obtain the authorization token
The authorization token is generated by Antom when merchants authorize you as an ISV. This token is used to identify the merchant when the merchant calls the API, and the token is set in the Agent-Token header for each call.
You can also check authorization-related statistics under Basic Information.
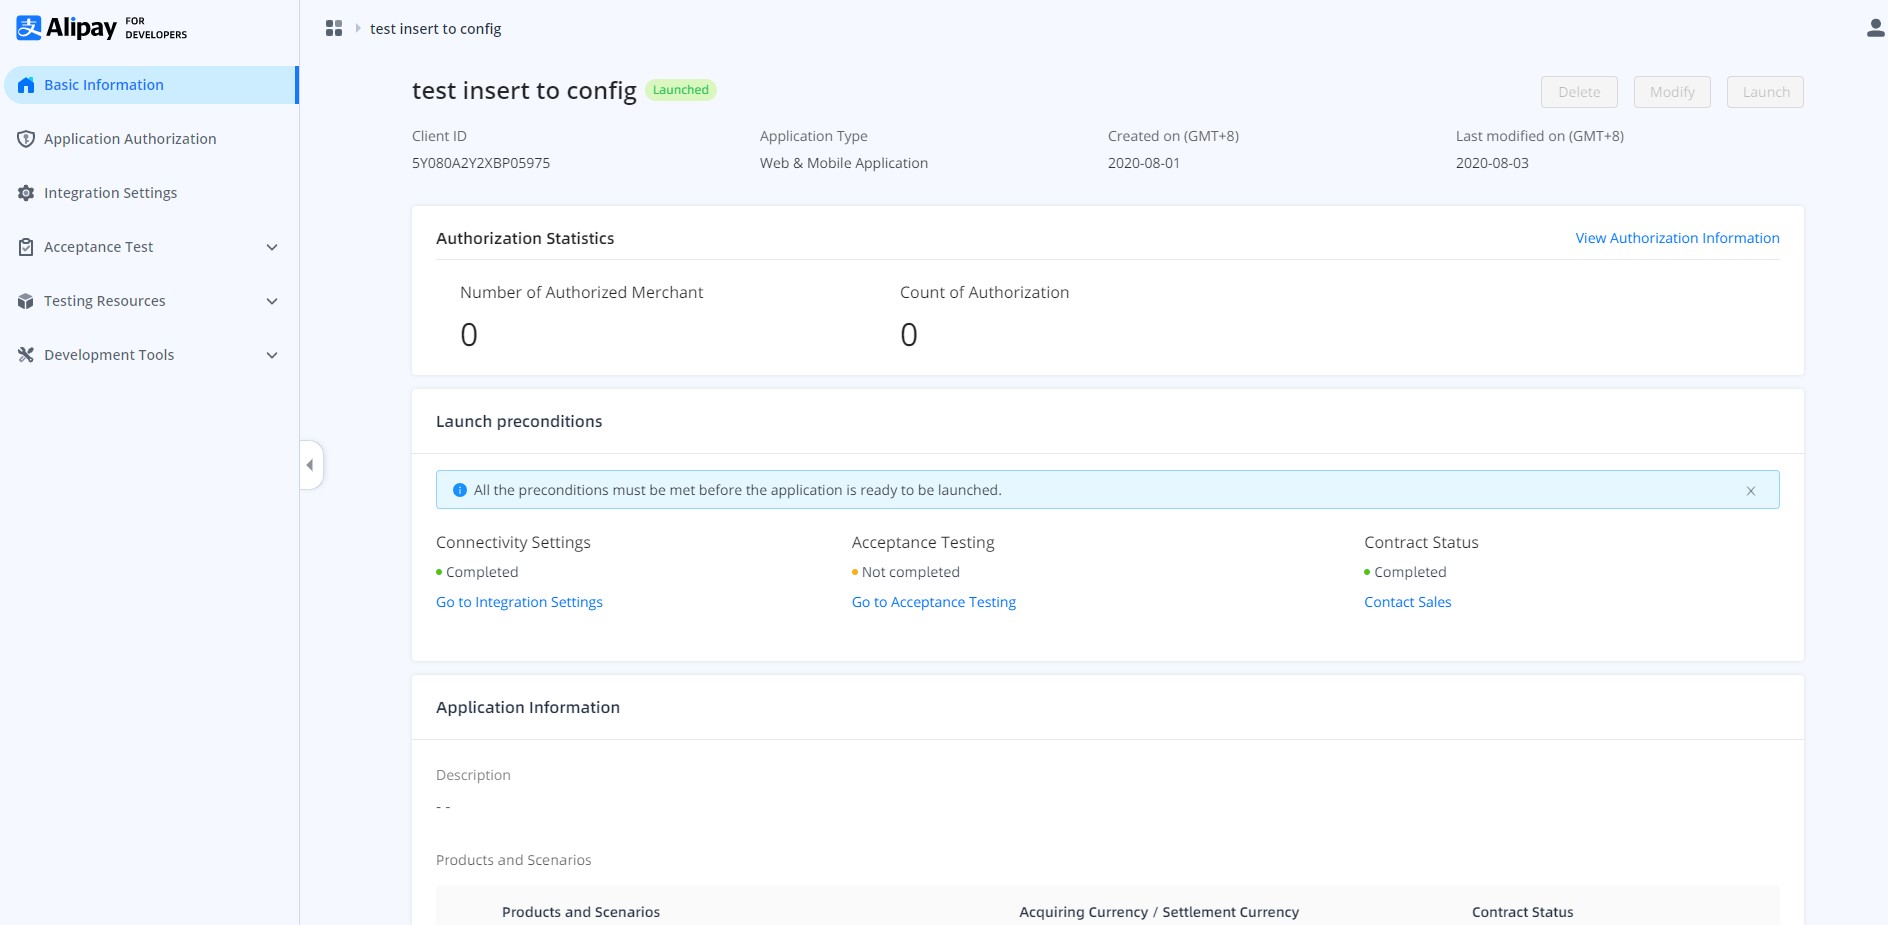
Figure 17. Basic information page
