Auto Debit (Web)
This article introduces the integration solution to support automatic deduction from a desktop browser. After integration, you can access various payment methods like digital wallets, bank cards, and bank transfers.
User experience
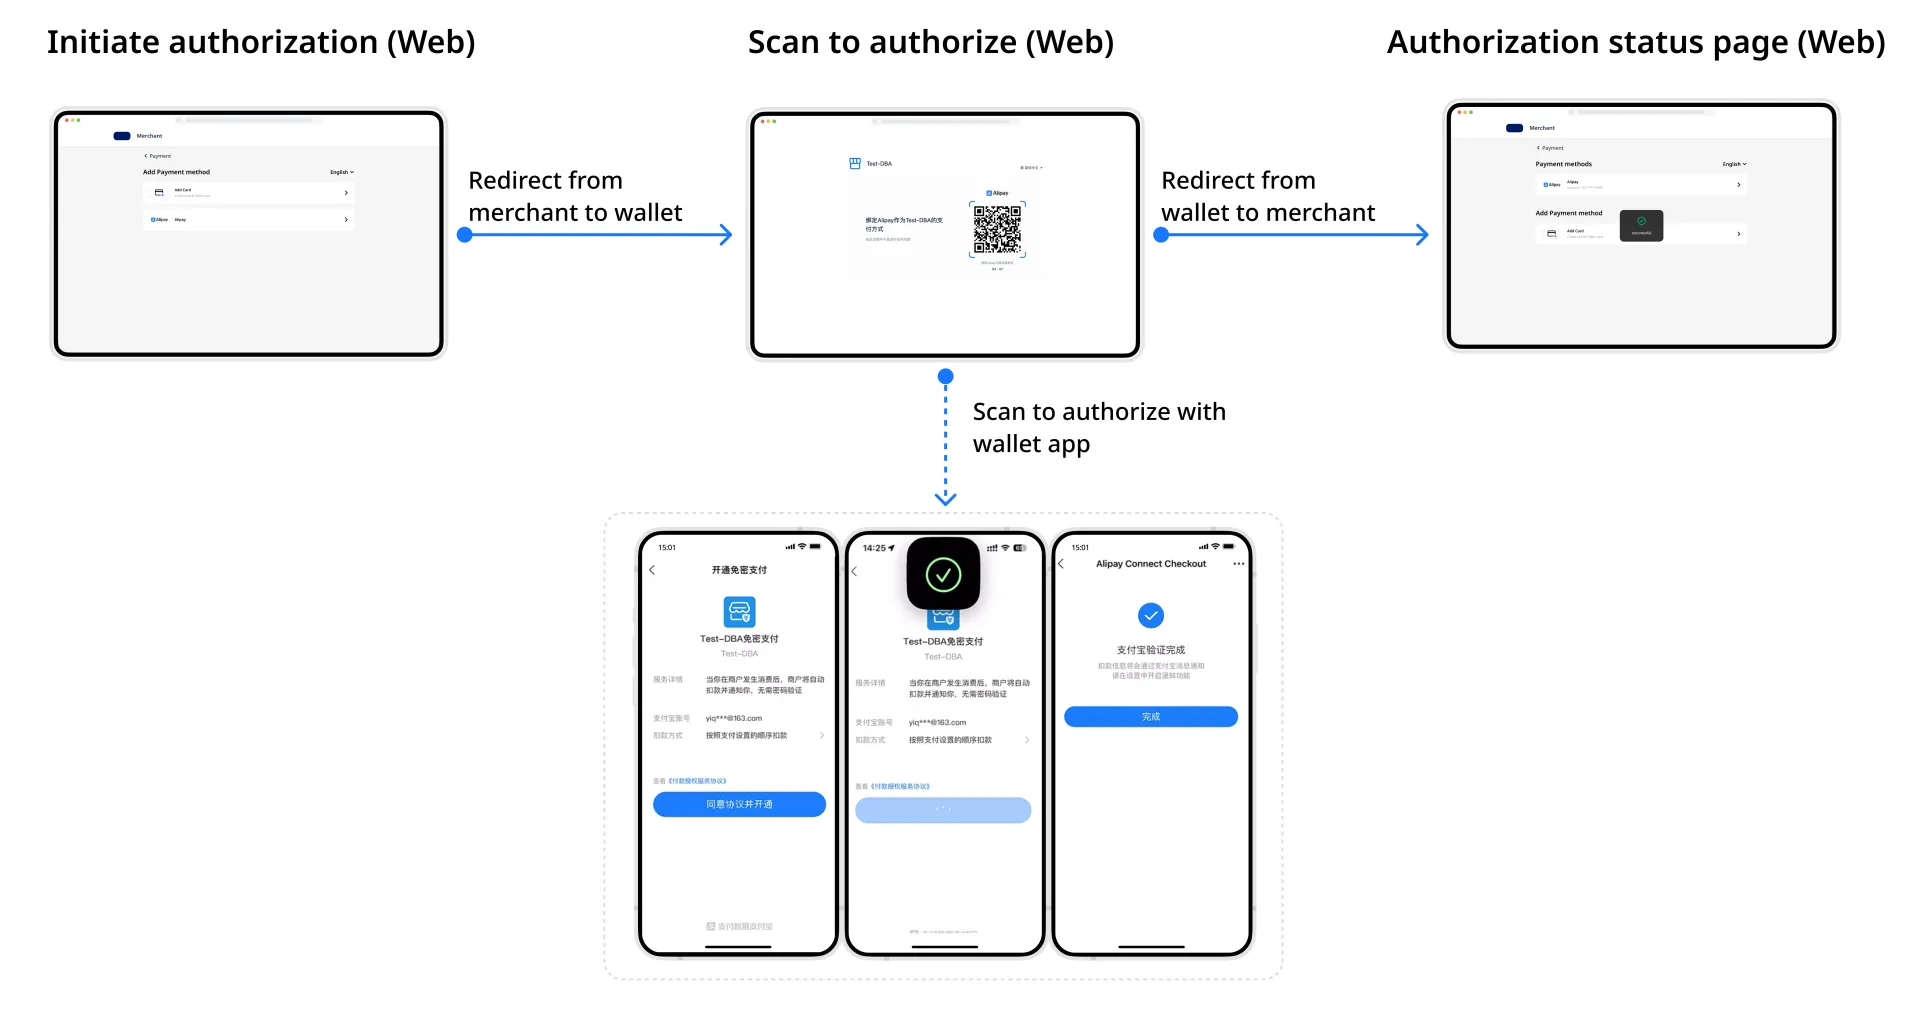
Code scanning user experience
In this case, the buyer is to be redirected to a page where a QR code is presented for the buyer to scan and authorize. For example:
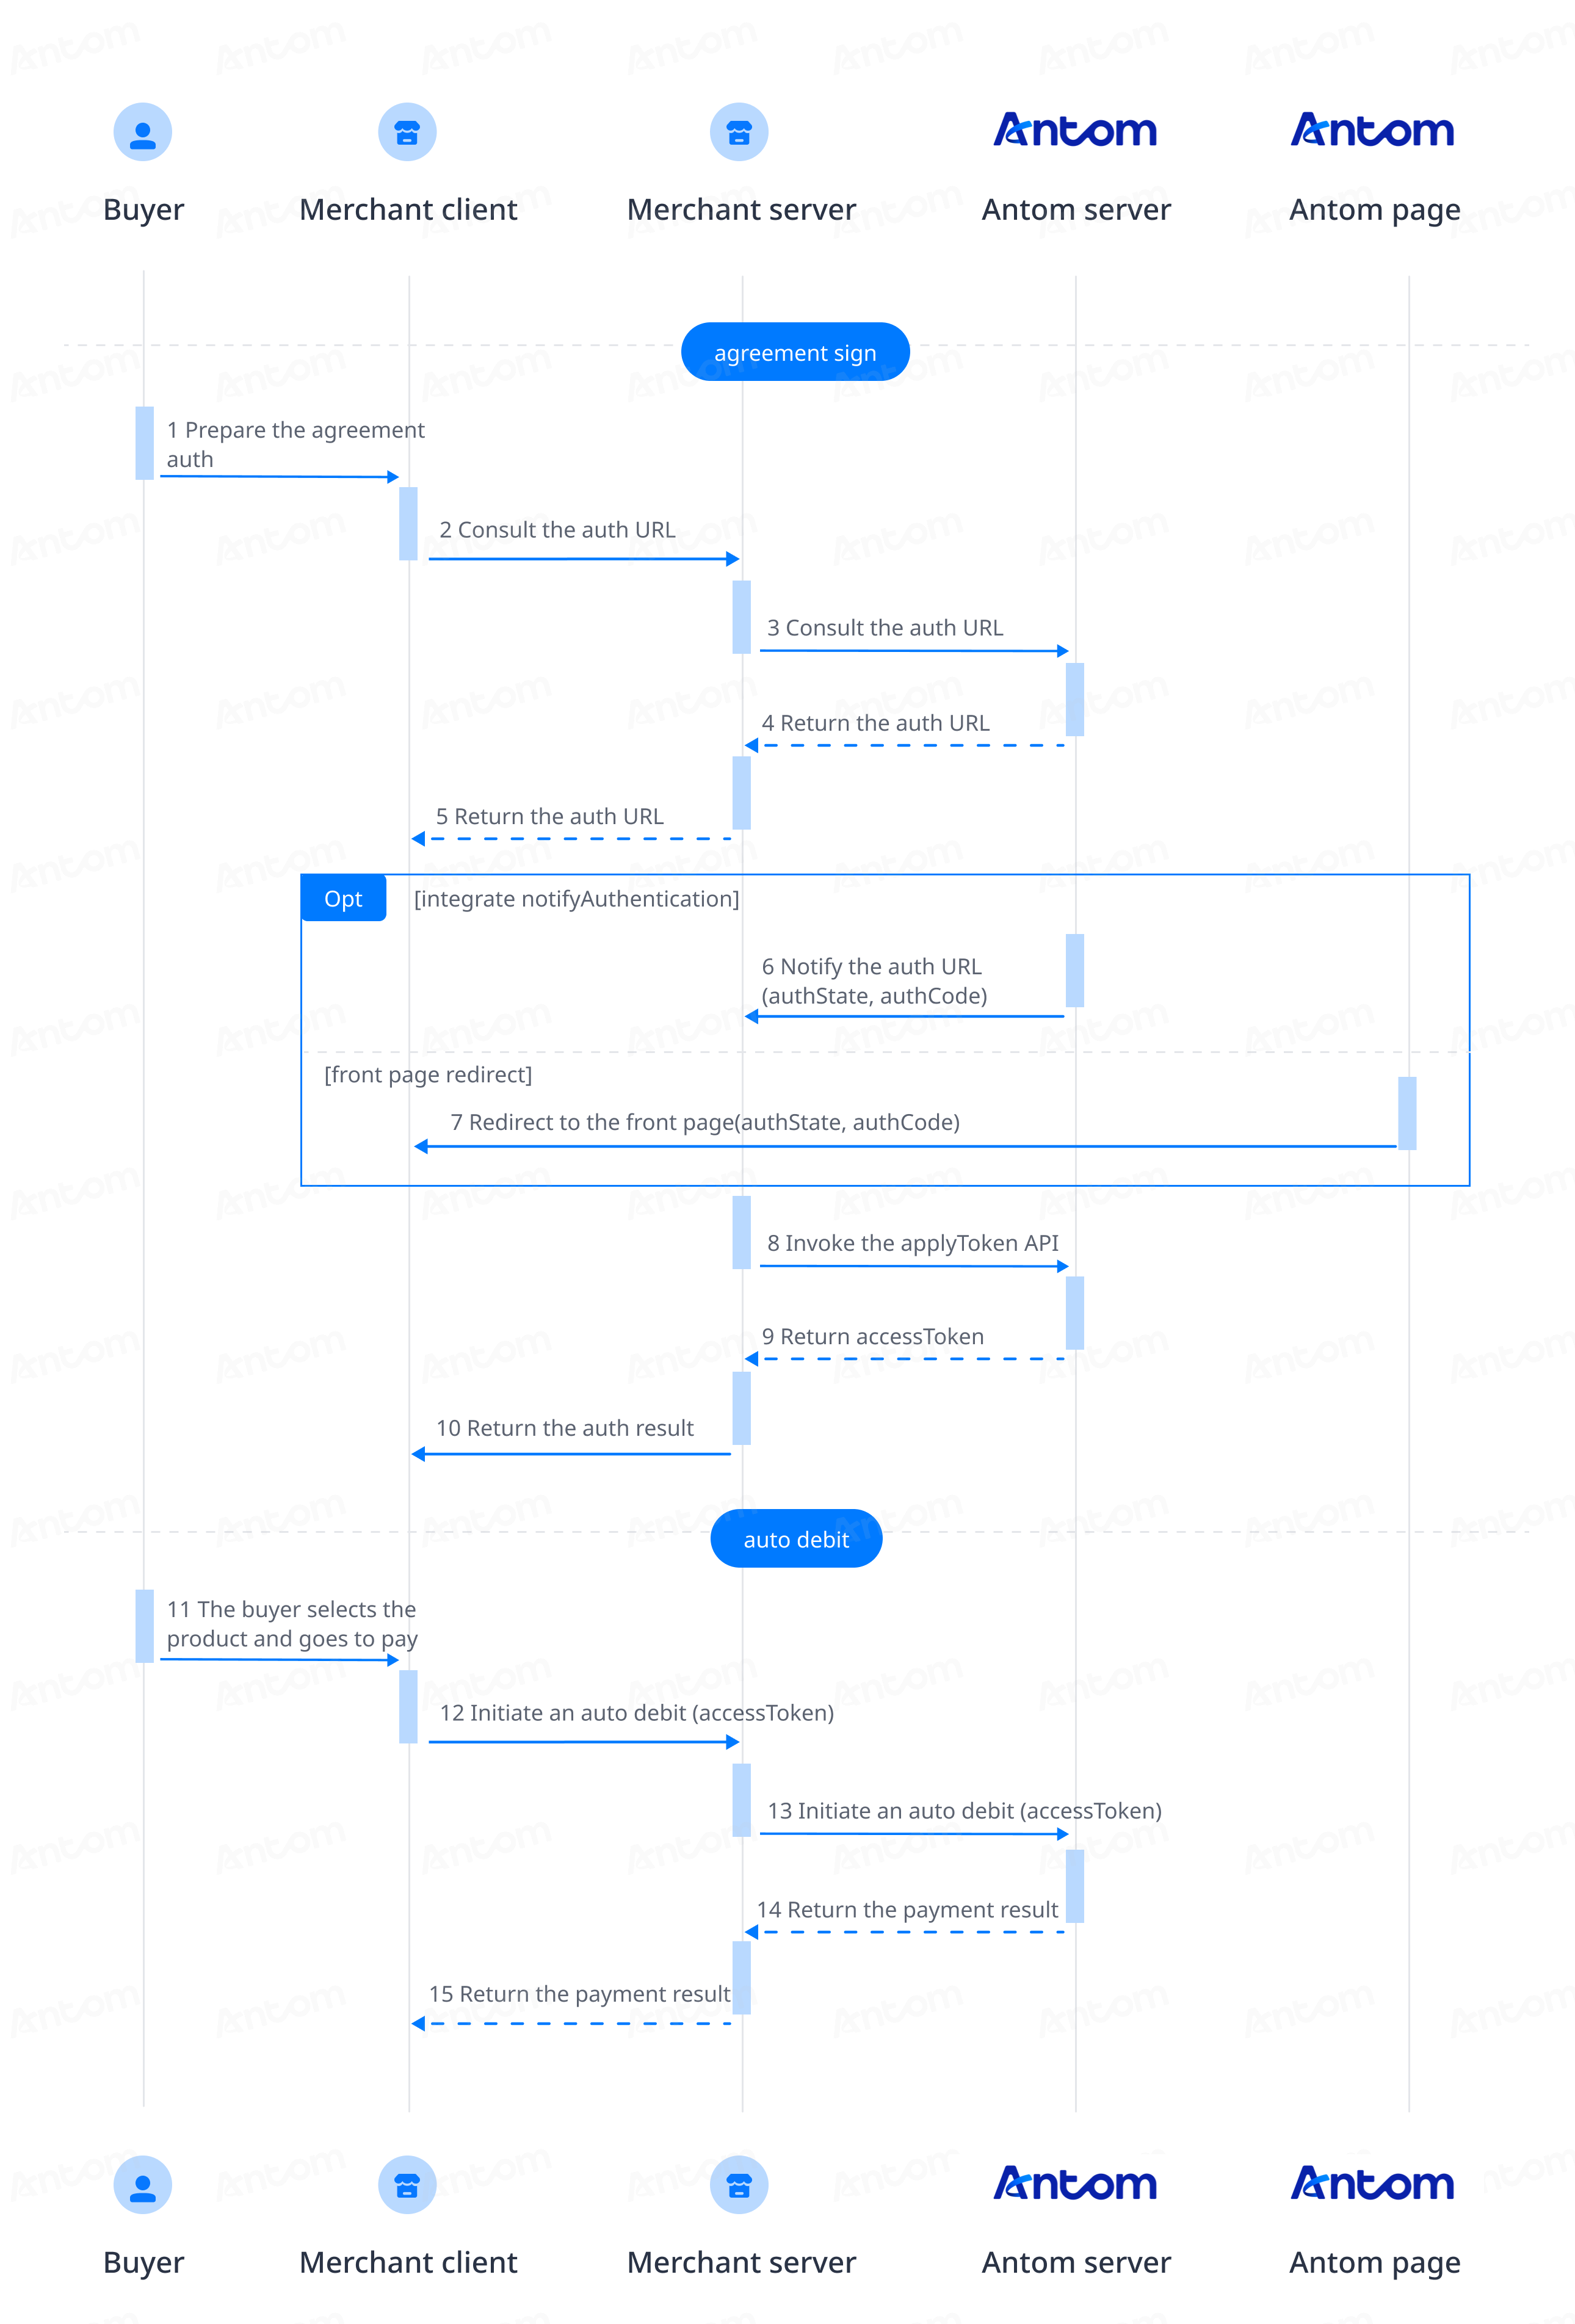
Payment flow
After obtaining the buyer's authorization, you can directly initiate the Auto Debit service without the need to go through the authorization process again for each payment.
Before conducting an automatic deduction, you need to obtain the buyer's authorization first. Once the buyer agrees to authorize, use an authorization code to obtain a payment token, which is used for conducting subsequent Auto Debit.

Integration steps
You can obtain the buyer's authorization and conduct an Auto Debit by completing the following integration steps:
- Get and redirect to the authorization URL
- Obtain the authorization code
- Apply for a payment token
- Initiate an Auto Debit
- Obtain payment results
Step 1: Get and redirect to authorization URL
You need to get the authorization URL first and redirect buyers to the authorization URL to complete authorizations. For WEB integration, the authorization URL can be obtained from the value of normalUrl returned in the consult API response.
Get the authorization URL
Antom provides server-side API libraries for multiple languages. The following codes use Java as an example. You need to install Java 6 or higher.
Install an API library
Find the latest version on GitHub.
<dependency>
    <groupId>com.alipay.global.sdk</groupId>
    <artifactId>global-open-sdk-java</artifactId>
    <version>2.0.44</version>
</dependency>
Initialize the request instance
import com.alipay.global.api.AlipayClient;
import com.alipay.global.api.DefaultAlipayClient;
import com.alipay.global.api.model.constants.EndPointConstants;

public class Sample {
    public static final String        CLIENT_ID            = "";
    public static final String        ANTOM_PUBLIC_KEY     = "";
    public static final String        MERCHANT_PRIVATE_KEY = "";

    private final static AlipayClient CLIENT               = new DefaultAlipayClient(
            EndPointConstants.SG, MERCHANT_PRIVATE_KEY, ANTOM_PUBLIC_KEY, CLIENT_ID);

}
Call the consult API
Specify the following parameters in the consult request:
Parameter name | Is required? | Description |
authRedirectUrl | Yes | The URL used to redirect buyers to the merchant page after the authorization is completed. |
authState | Yes | A string specified by you to identify an authorization request. |
customerBelongsTo | Yes | Specify the target payment method for which you are requesting authorization. |
scopes | Yes | In this scenario, the field is fixed to |
terminalType | Yes | Indicates the terminal type where the merchant terminal is located. In this case, the value is |
The following sample code is used for calling the consult API to get the authorization URL:
public static void authorizationConsult() {
    AlipayAuthConsultRequest alipayAuthConsultRequest = new AlipayAuthConsultRequest();

    // replace with your authState
    String authState = UUID.randomUUID().toString();
    alipayAuthConsultRequest.setAuthState(authState);

    // set the target payment method for which you are requesting authorization
    alipayAuthConsultRequest.setCustomerBelongsTo(CustomerBelongsTo.GCASH);

    // set the authorization scope
    alipayAuthConsultRequest.setScopes(new ScopeType[]{ScopeType.AGREEMENT_PAY});

    // set terminalType
    alipayAuthConsultRequest.setTerminalType(TerminalType.WEB);

    // replace with your authRedirectUrl
    alipayAuthConsultRequest.setAuthRedirectUrl("http://www.yourRedirectUrl.com");

    // do authorization consult
    AlipayAuthConsultResponse alipayAuthConsultResponse;
    try {
        alipayAuthConsultResponse = CLIENT.execute(alipayAuthConsultRequest);
    } catch (AlipayApiException e) {
        String errorMsg = e.getMessage();
        // handle error condition
    }
}
The following code shows a sample of the request message:
{
    "authRedirectUrl": "http://www.yourRedirectUrl.com",
    "authState": "556c1e32-3723-4b02-88ed-8c46087540ca",
    "customerBelongsTo": "GCASH",
    "scopes": [
        "AGREEMENT_PAY"
    ],
    "terminalType": "WEB"
}
Receive a consult response
The consult API response includes the authorization URL (normalUrl) that the buyer needs to be redirected to:
{
    "authCodeForm": {
        "codeDetails": [
            {
                "codeValue": "https://iexpfront-sea.alipay.com/showQrImage.htm?logoImg=a***",
                "displayType": "IMAGE"
            },
            {
                "codeValue": "https://open-sea-global.alipayplus.com/aps/long/vbxsTndnmS",
                "displayType": "TEXT"
            }
        ]
    },
    "normalUrl": "https://g.alipayplus.com/page/aplus-linker/acwallet/authorization.html?acqSiteId=1***",
    "result": {
        "resultCode": "SUCCESS",
        "resultMessage": "success.",
        "resultStatus": "S"
    }
}
Common questions
Q: How to set terminalType?
A: The valid values of terminalType are:
- If the buyer initiates a transaction from PC, the terminalType needs to be specified as
WEB.- If the buyer initiates a transaction from the mobile browser, the terminalType needs to be specified as
WAP. Add the osType parameter and fill in the corresponding system parametersANDROIDorIOSaccording to the buyer's mobile phone.- If the buyer initiates a transaction from app, the terminalType needs to be specified as
APP.Q: Can I use Chinese characters in the value of the request parameters?
A: To avoid incompatibility of a certain payment method, do not use Chinese characters for fields in the request.
Q: How to set the URL to receive the payment notification?
A: Antom sends you the payment result via notifyPayment. You can provide the address to receive the notification in Antom Dashboard.
Q: What should I do after getting the returned normalUrl?
A: For transactions that occur in the desktop browser, Antom returns the normalUrl parameter in the consult response. Your server needs to pass this URL to your client for redirection. It is recommended not to cache the returned normalUrl. When the authorization is initiated again, you need to obtain a new normalUrl for redirection.
Redirect to the authorization URL
After your server gets normalUrl, pass the URL to your client side. Your front-end page performs the action of redirecting the buyer to the address specified by normalUrl. The authorization process can lead to authorization success or failure, with different redirections in each case:
- Authorization success: Upon successful completion of the authorization process, redirect the buyer to a page with the address being a reconstructed URL that includes the authRedirectUrl, authCode, and authState values.
- Authorization failure: In instances where the buyer leaves the authorization page without completing the process, certain payment methods enable redirection to the page with the address set as authRedirectUrl. In cases where authorization times out or fails, and the buyer is unable to be redirected to the authRedirectUrl page, we advise guiding the buyer to restart the authorization process. Typically, if the buyer fails to be redirected to the authRedirectUrl page from the payment method application within 15 minutes, the authorization fails.
Note: Since the authorization URL can only be used once, if the user authorization fails, you need to call the consult API again with a new authState value.
Step 2: Obtain the authorization code
After the buyer completes the authorization, you can obtain the authorization code (authCode) in one of the following ways:
- Obtain authCode from the reconstructed URL returned by the payment method.
- Obtain authCode from the asynchronous authorization notification sent by Antom.
Obtain authCode from reconstructed URL
After the buyer's authorization process is completed, the buyer is to be redirected to the reconstructed URL returned by the payment method. This URL consists of three parts:
- The value of the authRedirectUrl parameter that you specified in the consult API.
- The authCode returned by the payment method.
- The value of the authState parameter that you specified in the consult API.
The following sample shows a reconstructed URL:
https://www.alipay.com/?authCode=d2f60253-ecdc-e9bc-27d1-566970191040&authState=663A8FA9-D836-48EE-8AA1-1FF682989DC7You can obtain the authCode value from the reconstructed URL. However, before using the authCode value, it is necessary to check whether the value of authState in the reconstructed URL is consistent with the value of the authState parameter you specified in the consult API. If they are inconsistent, authCode in the reconstructed URL cannot be used because the reconstructed URL is not reliable due to possible malicious events such as attacks during the redirection process.
Obtain authCode from authorization notification
Due to network issues or other reasons, you might not be able to obtain the reconstructed URL. Instead, you can obtain authCode from the authorization notification sent by Antom by following these steps:
- Configure the address for receiving the asynchronous authorization notifications. For more details, see Notifications.
- After the buyer agrees to authorize, you will receive an authorization success notification sent by Antom.
- After receiving the asynchronous notification, send a response to Antom with a format presented in the Requirements topic. Otherwise, Antom resends the asynchronous notification.
Note: You can get authCode from either the reconstructed URL or the authorization notification. In case you have received multiple authCodes, use the first one that arrives and do not reuse the same authCode value when applying for payment tokens.
The following is an notification request sample:
{
    "authorizationNotifyType": "AUTHCODE_CREATED",
    "authState": "556c1e32-3723-4b02-88ed-8c46087540ca",
    "authCode": "28100113_1631148338197000019ba74",
    "result": {
        "resultCode": "SUCCESS",
        "resultMessage": "success",
        "resultStatus": "S"
    }
}
How to verify the signature of the notification and make a response to the notification, see Sign a request and verify the signature.
Common questions
Q: When will the notification be sent?
A: After the buyer's authorization is completed, Antom sends an asynchronous notification to you.
Q: Will the asynchronous notification be re-sent?
A: Yes, the asynchronous notification will be re-sent automatically within 24 hours for the following cases:
- If you didn't receive the asynchronous notification due to network reasons.
- If you receive an asynchronous notification from Antom, but you didn't make a response to the notification in the Sample code format.
The notification can be resent up to 8 times or until a correct response is received to terminate delivery. The sending intervals are as follows: 0 minutes, 2 minutes, 10 minutes, 10 minutes, 1 hour, 2 hours, 6 hours, and 15 hours.
Q: When responding to asynchronous notification, do I need to add a digital signature?
A: If you receive an asynchronous notification from Antom, you are required to return the response in the Sample code format, but you do not need to countersign the response.
Q: What are the key parameters in the notification that I need to use?
A: Pay attention to the following key parameters:
- authorizationNotifyType: Indicates the notification type. In this case, the value is
AUTHCODE_CREATED.- authState: The request ID you provided when calling the consult API.
- authCode: The authorization code generated after the user completes authorization. Use this authorization code to request for a payment token.
Step 3: Apply for a payment token
Call the applyToken API within one minute after obtaining authCode to apply for the payment token (accessToken). Otherwise, authCode will expire and become invalid. Only with accessToken can an automatic deduction from the buyer's account be implemented.
When calling the applyToken API, specify the following parameters correctly in the request:
Parameter name | Is required? | Description |
grantType | Yes | Specify the fixed value |
customerBelongsTo | Yes | Specify the target payment method for which you are requesting authorization. |
authCode | Yes | Specify the value of authcode that you obtained. |
The following code is a sample of applying for the payment token:
public static void applyToken() {
    String authCode = "yourAuthCode";
    AlipayAuthApplyTokenRequest alipayPayRequest = new AlipayAuthApplyTokenRequest();

    // set grant type
    alipayPayRequest.setGrantType(GrantType.AUTHORIZATION_CODE);
    // set the target payment method for which you are requesting authorization
    alipayPayRequest.setCustomerBelongsTo(CustomerBelongsTo.GCASH);
    // set auth code
    alipayPayRequest.setAuthCode(authCode);

    // do apply token
    AlipayAuthApplyTokenResponse authApplyTokenResponse;
    try {
        authApplyTokenResponse = CLIENT.execute(alipayPayRequest);
    } catch (AlipayApiException e) {
        String errorMsg = e.getMessage();
        // handle error condition
    }
}
The following sample is a request message for applying for the payment token:
{
  "authCode": "663A8FA9D83648EE8AA11FF68298XXXX",
  "customerBelongsTo": "GCASH",
  "grantType": "AUTHORIZATION_CODE"
}
In the response, you will receive the following key parameter:
- accessToken: the payment token.
Notes:
- Due to historical reasons, the key parameter above is applicable to new merchants in Antom. Refer to the table below for more information on token expiration time. If you have previously utilized the accessTokenExpiryTime, refreshToken, and refreshTokenExpiryTime fields, you may continue using your original logic.
- If no response is received after calling the API, it is recommended that you use the same parameters and parameter values to initiate the request again.
- If you can receive a response after calling the API, but the payment token (accessToken) is not returned in the response, take the following actions:
- If result.resultStatus value is
U, use the same parameters and parameter values to initiate the request again.- If the value of result.resultStatus is
F, address the associated issues based on the prompts provided by result.resultCode. If you need to call the applyToken API again to obtain a payment token, since the authCode can only be used once, you need to start over again from Step 1 to get the authorization URL, redirect to the authorization URL, get a new authCode, and then call the applyToken API again.
- If you need to display the authorized account to the buyer, use the value of userLoginId returned in the applyToken API. The returned value of this field has been desensitized and can be displayed directly.
Regarding the payment methods supported by Auto Debit, the validity period of the payment token is shown in the following table:
Payment method | Validity period of token |
Alipay | 92 years |
Kakao Pay | 100 years |
AlipayHK | 100 years |
GCash | 100 years |
DANA | 100 years |
| Touch'n Go eWallet | 100 years |
| TrueMoney | 100 years |
PayPay | 100 years |
NAVER Pay | 2 years |
Boost | 100 years |
| KrungThai Bank | 76 years |
| Siam Commercial Bank | 76 years |
| Grabpay SG | 10 years |
| Grabpay MY/PH | 10 years |
K PLUS | 100 years |
Maya | 100 years |
| LINE Pay | 100 years |
| Toss Pay | 14 years |
ZaloPay | 10 years |
Step 4: Initiate an auto debit
Once you have obtained the buyer's authorization, you can provide the Auto Debit service directly to buyers without requiring them to undergo the authorization process for each payment.
Specify the following parameters when initiating an Auto Debit:
Parameter name | Is required? | Description |
productCode | Yes | In this scenario, this field is fixed to |
paymentRequestId | Yes | A unique ID generated by the merchant. For each payment is initiated, a new ID must be created. |
paymentAmount | Yes | The payment amount needs to be set in the smallest unit of the single currency, such as CNY for cents and KRW for yuan. |
paymentMethod | Yes | Payment method enumeration value |
paymentMethod.paymentMethodId | Yes | The value of the payment token (accessToken) obtained by calling the the applyToken API |
paymentNotifyUrl | No | The payment result notification address can be transmitted through the API, or a fixed value can be set in the portal. |
settlementStrategy | No | The settlement currency of this payment. If the business has signed multiple settlement currencies, it needs to be specified in the API. |
order | Yes | Order information, including merchant order amount, order id, order description and other information |
env | Yes | The terminal type from where the buyer initiates the transaction. For example, the transaction is initiated from the merchant PC website, the value is env.terminalType = |
The parameters listed above are not comprehensive. See the pay API for a complete list of parameters and any additional requirements for specific payment methods.
The following sample code shows how to initiate an Auto Debit:
public static void pay() {
    AlipayPayRequest alipayPayRequest = new AlipayPayRequest();
    alipayPayRequest.setProductCode(ProductCodeType.AGREEMENT_PAYMENT);

    // replace with your paymentRequestId
    String paymentRequestId = UUID.randomUUID().toString();
    alipayPayRequest.setPaymentRequestId(paymentRequestId);

    // set amount
    // you should convert amount unit(in practice, amount should be calculated on your serverside)
    Amount amount = Amount.builder().currency("SGD").value("550000").build();
    alipayPayRequest.setPaymentAmount(amount);

    // set paymentMethod
    PaymentMethod paymentMethod = PaymentMethod.builder().paymentMethodType("GCASH").
            paymentMethodId("2828XXX77801726307481000Iba1Pm20IU171000179").build();
    alipayPayRequest.setPaymentMethod(paymentMethod);

    // set buyer info
    Buyer buyer = Buyer.builder().referenceBuyerId("yourBuyerId").build();

    // replace with your orderId
    String orderId = UUID.randomUUID().toString();
    // set order Info
    Order order = Order.builder().referenceOrderId(orderId).
            orderDescription("antom api testing order").orderAmount(amount).buyer(buyer).build();
    alipayPayRequest.setOrder(order);

    // set env info
    Env env = Env.builder().terminalType(TerminalType.WEB).clientIp("114.121.121.01").build();
    alipayPayRequest.setEnv(env);

    // replace with your notify url
    alipayPayRequest.setPaymentNotifyUrl("http://www.yourNotifyUrl.com");

    AlipayPayResponse alipayPayResponse;
    try {
        alipayPayResponse = CLIENT.execute(alipayPayRequest);
    } catch (AlipayApiException e) {
        String errorMsg = e.getMessage();
        // handle error condition
    }
}
The following code shows a sample of the request message:
{
    "env": {
        "clientIp": "114.121.121.01",
        "terminalType": "WEB"
    },
    "order": {
        "buyer": {
            "referenceBuyerId": "yourBuyerId"
        },
        "orderAmount": {
            "currency": "SGD",
            "value": "550000"
        },
        "orderDescription": "antom api testing order",
        "referenceOrderId": "f69cb774-8d47-4da9-bf91-08c656581cdf"
    },
    "paymentAmount": {
        "currency": "SGD",
        "value": "550000"
    },
    "paymentMethod": {
        "paymentMethodId": "2828XXX77801726307481000Iba1Pm20IU171000179",
        "paymentMethodType": "GCASH"
    },
    "paymentNotifyUrl": "http://www.yourNotifyUrl.com",
    "paymentRequestId": "214c60e7-672d-4ad8-9163-905ad4abe71f",
    "productCode": "AGREEMENT_PAYMENT"
}
Common questions
Q: How to set terminalType?
A: The valid values of terminalType are:
- If the buyer initiates a transaction from PC, the terminalType needs to be specified as
WEB.- If the buyer initiates a transaction from the mobile browser, the terminalType needs to be specified as
WAP. Add the osType parameter and fill in the corresponding system parametersANDROIDorIOSaccording to the buyer's mobile phone.- If the buyer initiates a transaction from app, the terminalType needs to be specified as
APP.Q: Can I use Chinese characters in the value of the request parameters?
A: To avoid incompatibility of a certain payment method, do not use Chinese characters for fields in the request.
Q: How to set the URL to receive the payment notification?
A: Specify paymentNotifyUrl in the createPaymentSession API to receive the asynchronous notification about the payment result (notifyPayment), or configure the receiving URL in Antom Dashboard. If the URL is specified in both the request and Antom Dashboard, the value specified in the request takes precedence.
Step 5: Obtain payment results
After the buyer completes the payment or the payment times out, get the corresponding payment result in one of the following ways:
- receive the asynchronous notification sent by Antom
- inquire about the payment result actively
Receive the asynchronous notification
When a payment is completed or fails, Antom sends an asynchronous notification (notifyPayment) to the address that you specified in the pay API via the paymentNotifyUrl parameter or in Antom Dashboard.
The following sample code shows a notification:
{
    "actualPaymentAmount": {
        "currency": "SGD",
        "value": "550000"
    },
    "notifyType": "PAYMENT_RESULT",
    "paymentAmount": {
        "currency": "SGD",
        "value": "550000"
    },
    "paymentCreateTime": "2024-09-14T02:59:28-07:00",
    "paymentId": "202409141940108001001888H0209958443",
    "paymentRequestId": "214c60e7-672d-4ad8-9163-905ad4abe71f",
    "paymentResultInfo": {},
    "paymentTime": "2024-09-14T02:59:30-07:00",
    "pspCustomerInfo": {
        "pspCustomerId": "use***@alipay.com",
        "pspName": "GCASH"
    },
    "result": {
        "resultCode": "SUCCESS",
        "resultMessage": "success.",
        "resultStatus": "S"
    }
}
How to verify the signature of the notification and make a response to the notification, see Sign a request and verify the signature.
The following code shows a sample of the notification response:
{
  "result": {
    "resultCode": "SUCCESS",
    "resultStatus": "S",
    "resultMessage": "Success"
  }
}
Common questions
Q: When will the notification be sent?
A: It depends on whether the payment is completed:
- If the payment is successfully completed, Antom will usually send you an asynchronous notification within 3 to 5 seconds. For some payment methods like OTC, the notification might take a bit longer.
- If the payment is not completed, Antom needs to close the order first before sending an asynchronous notification. The time it takes for different payment methods to close the order varies, usually defaulting to 14 minutes.
Q: Will the asynchronous notification be re-sent?
A: Yes, the asynchronous notification will be re-sent automatically within 24 hours for the following cases:
- If you didn't receive the asynchronous notification due to network reasons.
- If you receive an asynchronous notification from Antom, but you didn't make a response to the notification in the Sample code format.
The notification can be resent up to 8 times or until a correct response is received to terminate delivery. The sending intervals are as follows: 0 minutes, 2 minutes, 10 minutes, 10 minutes, 1 hour, 2 hours, 6 hours, and 15 hours.
Q: When responding to asynchronous notification, do I need to add a digital signature?
A: If you receive an asynchronous notification from Antom, you are required to return the response in the Sample code format, but you do not need to countersign the response.
Q: What are the key parameters in the notification that I need to use?
A: Pay attention to the following key parameters:
- result: indicates the payment result of the order.
- paymentRequestId: indicates the payment request number you generated for consult, cancel, and reconciliation.
- paymentId: indicates the payment order number generated by Antom, used for refund and reconciliation.
- paymentAmount: indicates the payment amount.
Inquire about the payment result
Initiate a inquiryPayment request and specify the following parameter:
Parameter name | Is required? | Description |
paymentRequestId | No | The payment request number generated by the merchant. |
The following code shows a sample of calling the inquiryPayment API:
public static void inquiryPayment() {
    AlipayPayQueryRequest alipayPayQueryRequest = new AlipayPayQueryRequest();

    // replace with your paymentRequestId
    alipayPayQueryRequest.setPaymentRequestId("yourPaymentRequestId");

    AlipayPayQueryResponse alipayPayQueryResponse = null;
    try {
        alipayPayQueryResponse = CLIENT.execute(alipayPayQueryRequest);
    } catch (AlipayApiException e) {
        String errorMsg = e.getMessage();
        // handle error condition
    }
}
The following code shows a sample of the inquiryPayment response:
{
    "actualPaymentAmount": {
        "currency": "SGD",
        "value": "550000"
    },
    "paymentAmount": {
        "currency": "SGD",
        "value": "550000"
    },
    "paymentId": "202409141940108001001888H0209958443",
    "paymentRequestId": "214c60e7-672d-4ad8-9163-905ad4abe71f",
    "paymentResultCode": "SUCCESS",
    "paymentResultMessage": "success",
    "paymentStatus": "SUCCESS",
    "paymentTime": "2024-09-14T02:59:30-07:00",
    "pspCustomerInfo": {
        "pspName": "GCASH"
    },
    "result": {
        "resultCode": "SUCCESS",
        "resultMessage": "success.",
        "resultStatus": "S"
    }
}
Common questions
Q: How often should I call the inquiryPayment API?
A: Call the inquiryPayment API constantly with an interval of 2 seconds until the final payment result is obtained or an asynchronous payment result notification is received.
Q: What are the key parameters in the notification that I need to use?
A: Pay attention to these key parameters:
- result: represents the result of this inquiryPayment API call, the result of the order needs to be judged according to paymentStatus:
SUCCESSandFAILrepresent the final result.PROCESSINGrepresents the processing.
- paymentAmount: indicates the payment amount.
Best practice
Follow these best practices to improve integration efficiency.
Configure the authorization URL
After you call the consult API, different types of authorization URLs might be returned in the API response depending on the payment method used to proceed with the authorization process. For more details about authorization URLs returned for each payment method, see URLs returned for some payment methods.
For the terminal of WEB, normalUrl is returned in the response of the consult API.
Open normalUrl
After obtaining the normalUrl value, you need to redirect the buyer to the authorization page by using the authorization URL specified by normalUrl. We recommend that you open the URL in a new tab to guide the buyer to complete the authorization. The code for opening a new page is as follows:
if (serverResponse.normalUrl != null) {
    window.open(serverResponse.normalUrl, '_blank');
}
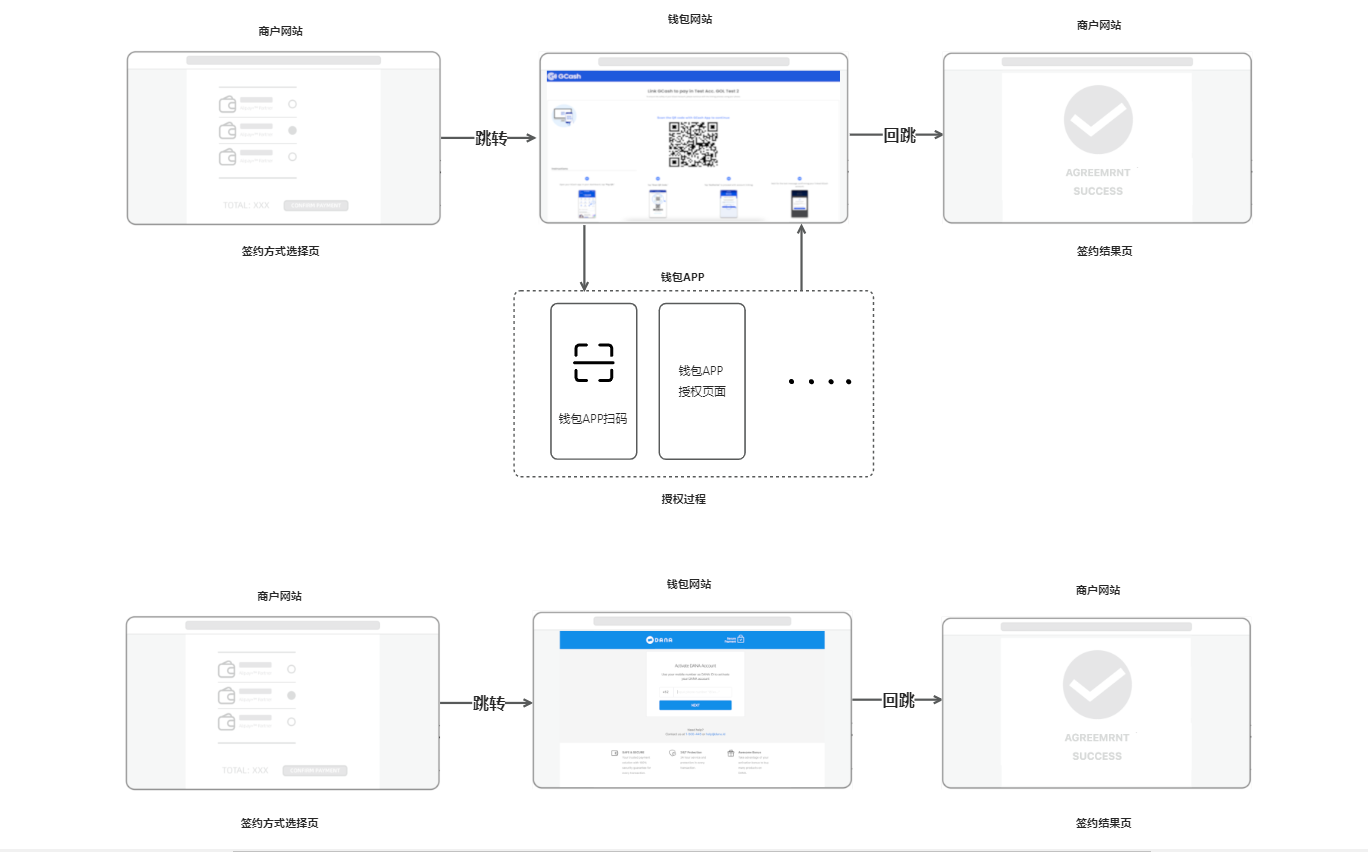
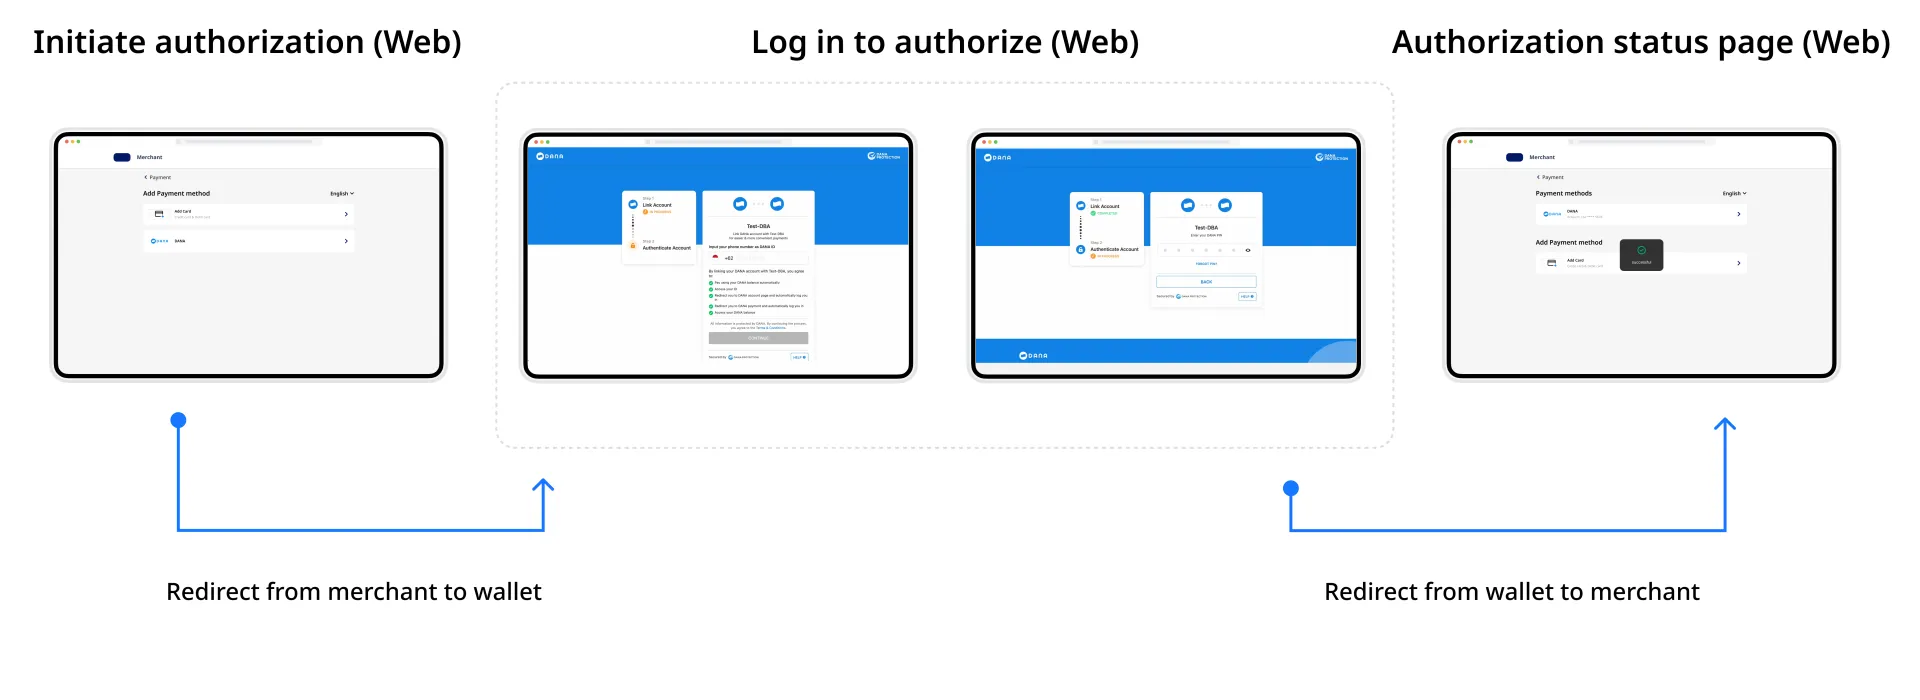
The authorization page that is rendered using normalUrl can be a QR code-scanning page or a login page. The following diagram shows the authorization process for the two cases:


