签名和验签
为了确保数据传输后的完整性和真实性,Antom 要求所有请求进行签名,并对签名进行验证:
- 当调用API时,你必须签署要发送给 Antom 的请求,并且依据相同的签名算法验证 Antom 的响应签名。
- 收到通知时,必须验证接收到的通知的签名。但不需要对通知的响应进行签名。
使用 Antom 库进行请求签名和签名验证可以大大简化编程任务并加快添加和验证接口签名的过程。有关使用Antom库进行签名和验证的更多详细信息,请参阅使用 Antom 库。
如果你不想使用 Antom 库 ,你可以通过自定义编码来 签署请求并验证签名,详情参见自定义编码 。
使用Antom库
本节指导你如何使用 Antom 库来签署请求以及在调用接口和接收 Antom 通知时验证签名。所有可用的 Antom 库可在 SDKs 中找到。
调用接口
在调用接口之前,请确保已在 Antom Dashboard上生成了一对非对称的公钥和私钥 。更多信息,请参阅生成密钥。
发送请求及处理响应
如果您使用 Antom 库进行接口调用,签名和验证过程将自动完成。以 Java 为例,按照以下步骤使用 Antom 库:
- 添加 Maven 依赖项
- 发送请求并验证签名
1. 添加 Maven 依赖项:
您可以在 GitHub 上找到最新版本。
<dependency>
  <groupId>com.alipay.global.sdk</groupId>
  <artifactId>global-open-sdk-java</artifactId>
  <version>{latest_version}</version>
</dependency>
2. 发送请求并验证签名
以下代码示例展示了如何使用 Java 发送请求并验证签名:
import org.springframework.web.bind.annotation.RequestMapping;
import org.springframework.web.bind.annotation.RestController;

import com.alipay.global.api.AlipayClient;
import com.alipay.global.api.DefaultAlipayClient;
import com.alipay.global.api.exception.AlipayApiException;
import com.alipay.global.api.model.ams.*;
import com.alipay.global.api.model.constants.EndPointConstants;
import com.alipay.global.api.request.ams.pay.AlipayPayRequest;
import com.alipay.global.api.response.ams.pay.AlipayPayResponse;

@RestController
public class PaymentBySDK {

    /**
     * alipay public key, used to verify signature
     */
    private static final String SERVER_PUBLIC_KEY = "";

    /**
     * your private key, used to sign
     * please ensure the secure storage of your private key to prevent leakage
     */
    private static final String CLIENT_PRIVATE_KEY = "";

    /**
     * you clientId
     */
    private static final String CLIENT_ID = "";

    public static AlipayClient defaultAlipayClient = new DefaultAlipayClient(EndPointConstants.SG, CLIENT_PRIVATE_KEY, SERVER_PUBLIC_KEY);

    @RequestMapping("/pay")
    public Object pay() {
        AlipayPayRequest alipayPayRequest = composePayRequest();

        AlipayPayResponse alipayPayResponse = null;
        try {
            // automatically sign and verify
            alipayPayResponse = defaultAlipayClient.execute(alipayPayRequest);
        } catch (AlipayApiException e) {
            String errorMsg = e.getMessage();
            // handle error condition
        }
        return alipayPayResponse;
    }

    private AlipayPayRequest composePayRequest() {
        AlipayPayRequest alipayPayRequest = new AlipayPayRequest();

        alipayPayRequest.setClientId(CLIENT_ID);
        alipayPayRequest.setPath("/ams/api/v1/payments/pay");

        Env env = new Env();
        env.setTerminalType(TerminalType.WEB);
        alipayPayRequest.setEnv(env);

        Amount amount = new Amount();
        amount.setCurrency("CNY");
        amount.setValue("100");
        alipayPayRequest.setPaymentAmount(amount);

        Amount orderAmount = new Amount();
        orderAmount.setCurrency("CNY");
        orderAmount.setValue("100");

        Order order = new Order();
        order.setReferenceOrderId("ORDER_ID_1685599933871");
        order.setOrderDescription("Testing order");
        order.setOrderAmount(orderAmount);
        alipayPayRequest.setOrder(order);

        PaymentMethod paymentMethod = new PaymentMethod();
        paymentMethod.setPaymentMethodType("ALIPAY_CN");
        alipayPayRequest.setPaymentMethod(paymentMethod);

        alipayPayRequest.setPaymentRequestId("REQUEST_ID_1685599933871");

        alipayPayRequest.setProductCode(ProductCodeType.CASHIER_PAYMENT);

        alipayPayRequest.setPaymentRedirectUrl("https://www.example.com");
        return alipayPayRequest;
    }

}
接收通知
在接收到 Antom 的通知后,验证请求的签名。验证请求签名的过程类似于发送请求和处理响应部分介绍的过程。按照以下步骤来验证签名:
- 获取 Antom 的公钥,用于验证签名。
- 从请求头中获取
request-time、client-id和signature。 - 验证签名。
以下代码示例展示了如何使用 Java 来验证签名 :
import javax.servlet.http.HttpServletRequest;

import org.springframework.http.ResponseEntity;
import org.springframework.web.bind.annotation.PostMapping;
import org.springframework.web.bind.annotation.RequestBody;
import org.springframework.web.bind.annotation.RestController;

import com.alipay.global.api.model.Result;
import com.alipay.global.api.model.ResultStatusType;
import com.alipay.global.api.response.AlipayResponse;
import com.alipay.global.api.tools.WebhookTool;

@RestController
public class PaymentNotifyHandleBySDK {

    /**
     * alipay public key, used to verify signature
     */
    private static final String SERVER_PUBLIC_KEY = "";

    /**
     * payment result notify processor
     * using <a href="https://spring.io">Spring Framework</a>
     *
     * @param request    HttpServletRequest
     * @param notifyBody notify body
     * @return
     */
    @PostMapping("/payNotify")
    public Object payNotifyHandler(HttpServletRequest request, @RequestBody String notifyBody) {

        // retrieve the required parameters from http request.
        String requestUri = request.getRequestURI();
        String requestMethod = request.getMethod();

        // retrieve the required parameters from request header.
        String requestTime = request.getHeader("request-time");
        String clientId = request.getHeader("client-id");
        String signature = request.getHeader("signature");

        Result result;
        AlipayResponse response = new AlipayResponse();

        try {
            // verify the signature of notification
            boolean verifyResult = WebhookTool.checkSignature(requestUri, requestMethod, clientId, requestTime, signature, notifyBody, SERVER_PUBLIC_KEY);
            if (!verifyResult) {
                throw new RuntimeException("Invalid notify signature");
            }

            // deserialize the notification body

            // update the order status with notify result

            // respond the server that the notification is received
            result = new Result("SUCCESS", "success", ResultStatusType.S);

        } catch (Exception e) {
            String errorMsg = e.getMessage();
            // handle error condition
            result = new Result("ERROR", errorMsg, ResultStatusType.F);
        }
        response.setResult(result);
        return ResponseEntity.ok().body(response);
    }

}
自定义编码
在开始之前,先了解 Antom 报文结构 的基础知识。
调用接口
在调用接口之前,确保已在 Antom Dashboard 上生成了一对非对称的公钥和私钥。有关更多信息,请参阅生成密钥。
请求签名
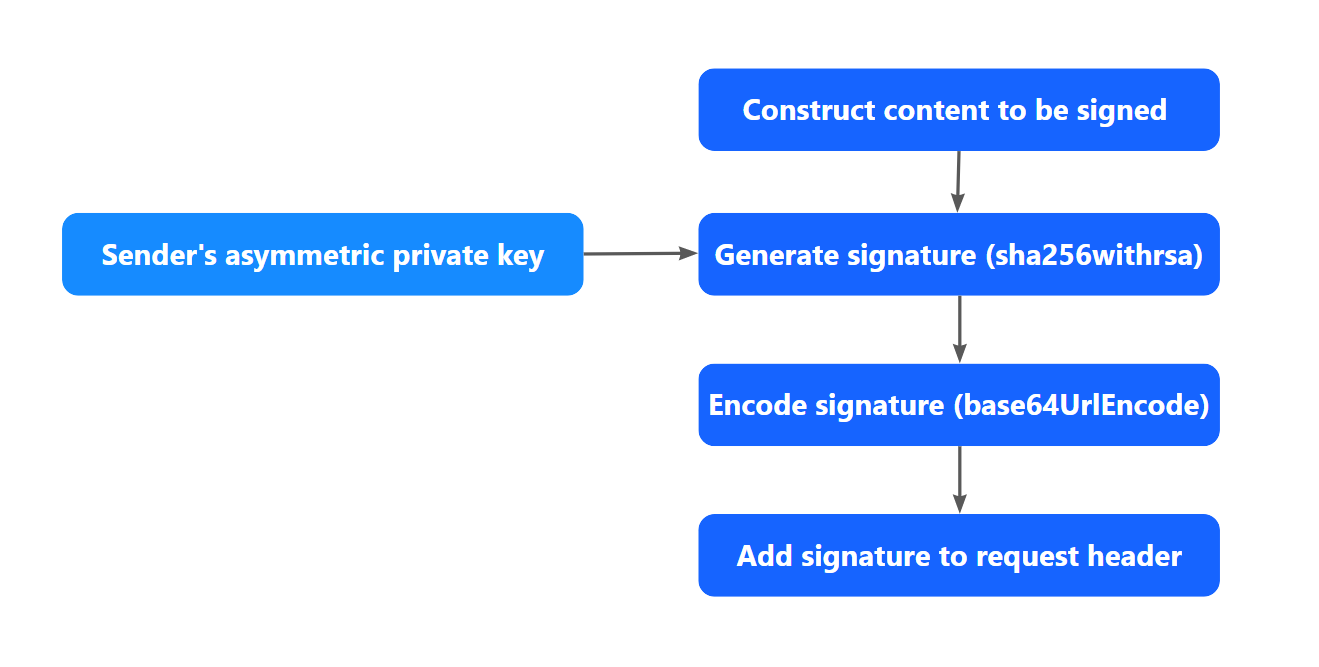
以下图示说明了如何对请求进行签名:

图1. 如何对请求进行签名
步骤1:构建待签名内容
待签名内容 content_to_be_signed 的语法如下:
<http-method> <http-uri>
<client-id>.<request-time>.<request-body>
注意 :<http-method>和<http-uri>之间需要一个空格字符。
-
http-method: HTTP 请求方法。其值始终为POST. -
http-uri: 包括资源路径和参数(如果有的话)。例如,如果 HTTP 链接是 https://open-na-global.alipay.com/ams/api/v1/payments/pay ,这个字段就是/ams/api/v1/payments/pay. -
client-id: 此参数在请求头中是必需的,用于识别客户端。一个示例值是SANDBOX_5X00000000000000。 -
request-time: 此参数在请求头中是必需的,表示请求发送时的时间戳。该字段的值必须精确到毫秒。一个示例值是1685599933871。 -
request-body: HTTP 请求正文。 请参考下面的示例代码:
{
    "env": {
        "terminalType": "WEB"
    },
    "order": {
        "orderAmount": {
            "currency": "CNY",
            "value": "100"
        },
        "orderDescription": "Testing order",
        "referenceOrderId": "ORDER_ID_1685599933871"
    },
    "paymentAmount": {
        "currency": "CNY",
        "value": "100"
    },
    "paymentMethod": {
        "paymentMethodType": "ALIPAY_CN"
    },
    "paymentRedirectUrl": "https://www.example.com",
    "paymentRequestId": "REQUEST_ID_1685599933871",
    "productCode": "CASHIER_PAYMENT"
}
通过遵循 content_to_be_signed 的语法规则,构建上述请求体如下:
POST /ams/api/v1/payments/pay
SANDBOX_5X00000000000000.1685599933871.{
    "env": {
        "terminalType": "WEB"
    },
    "order": {
        "orderAmount": {
            "currency": "CNY",
            "value": "100"
        },
        "orderDescription": "Testing order",
        "referenceOrderId": "ORDER_ID_1685599933871"
    },
    "paymentAmount": {
        "currency": "CNY",
        "value": "100"
    },
    "paymentMethod": {
        "paymentMethodType": "ALIPAY_CN"
    },
    "paymentRedirectUrl": "https://www.example.com",
    "paymentRequestId": "REQUEST_ID_1685599933871",
    "productCode": "CASHIER_PAYMENT"
}
步骤2:生成签名
生成签名的语法如下:
generated_signature=urlEncode(base64Encode(sha256withRSA(<content_to_be_signed>, <privateKey>)))-
generated_signature: 生成的签名字符串。 -
urlEncode: 对 Base64 编码的数字签名进行编码的方法。 -
base64Encode: 对生成的数字签名进行编码的方法。 -
sha256withrsa: 为提供的内容生成数字签名的方法。 -
content_to_be_signed: 从步骤 1 获取的内容。 -
privateKey: 私钥值。
生成签名的示例如下:
SVCvBbh5Eviwaj13ouTDy%2FAqFcNDNLXtoIgxFurTgnYjfBJ6h7jl4GKr%2Bkw8easQv9EHK7CXT9QZOMrkYNOUuqRs%2FDtT4vROCiRcnqNOKVjU3zHt%2Br%2Fxal%2FYRV4dc%2FNtu1ppyWJ6a2xNFCa63Y2YKNn%2FW%2B9eABmU2oohVXwBNoCnaLDoTIJV2RKb3E%2FiUp0aIWUz0Ntv4kVR8ZqMe6DUmf7pHRq9hm2av4wwBpJbHC%2B6R%2BMBQPv%2F0ZUFBW02ie%2FTpXBrPasb15s%2FjcmRpAnmED%2FFIec4TGzDIHr%2BO3QFtIRu72vg4zHWC3FuL4i8zfMXWNi3kp7hBFUIBpYroTZH5Q%3D%3D以下代码示例展示了如何使用 Java 对请求进行签名:
import java.net.URLEncoder;
import java.nio.charset.StandardCharsets;
import java.security.KeyFactory;
import java.security.PrivateKey;
import java.security.spec.PKCS8EncodedKeySpec;
import java.util.Base64;

public class SignatureSampleCode {

    /**
     * your private key, used to sign
     * please ensure the secure storage of your private keys to prevent leakage
     */
    private static final String CLIENT_PRIVATE_KEY = "";

    /**
     * you clientId
     */
    private static final String CLIENT_ID = "";

    /**
     * @param requestURI  domain part excluded, sample: /ams/api/v1/payments/pay
     * @param clientId    your clientId, sample: SANDBOX_5X00000000000000
     * @param requestTime timestamp in milliseconds, sample: 1685599933871
     * @param privateKey  your private key
     * @param requestBody request body
     * @return
     */
    public static String sign(String requestURI, String clientId, String requestTime, String privateKey, String requestBody) {

        // content_to_be_signed
        String contentToBeSigned = String.format("POST %s\n%s.%s.%s", requestURI, clientId, requestTime, requestBody);

        try {
            // sha256withRSA
            java.security.Signature signature = java.security.Signature.getInstance("SHA256withRSA");

            // privateKey
            PrivateKey priKey = KeyFactory.getInstance("RSA").generatePrivate(
                    new PKCS8EncodedKeySpec(Base64.getDecoder().decode(privateKey.getBytes(StandardCharsets.UTF_8))));

            signature.initSign(priKey);
            signature.update(contentToBeSigned.getBytes(StandardCharsets.UTF_8));

            // sign
            byte[] signed = signature.sign();

            // base64Encode
            String base64EncodedSignature = new String(Base64.getEncoder().encode(signed), StandardCharsets.UTF_8);

            // urlEncode
            return URLEncoder.encode(base64EncodedSignature, StandardCharsets.UTF_8.displayName());
        } catch (Exception e) {
            throw new RuntimeException(e);
        }
    }

    public static void main(String[] args) {
        System.out.println(sign("/ams/api/v1/payments/pay", CLIENT_ID, "1685599933871", CLIENT_PRIVATE_KEY, "{\n" +
                "    \"env\": {\n" +
                "        \"terminalType\": \"WEB\"\n" +
                "    },\n" +
                "    \"order\": {\n" +
                "        \"orderAmount\": {\n" +
                "            \"currency\": \"CNY\",\n" +
                "            \"value\": \"100\"\n" +
                "        },\n" +
                "        \"orderDescription\": \"Testing order\",\n" +
                "        \"referenceOrderId\": \"ORDER_ID_1685599933871\"\n" +
                "    },\n" +
                "    \"paymentAmount\": {\n" +
                "        \"currency\": \"CNY\",\n" +
                "        \"value\": \"100\"\n" +
                "    },\n" +
                "    \"paymentMethod\": {\n" +
                "        \"paymentMethodType\": \"ALIPAY_CN\"\n" +
                "    },\n" +
                "    \"paymentRedirectUrl\": \"https://www.example.com\",\n" +
                "    \"paymentRequestId\": \"REQUEST_ID_1685599933871\",\n" +
                "    \"productCode\": \"CASHIER_PAYMENT\"\n" +
                "}"));
    }

}
步骤3:将生成的签名添加到请求头中
- 根据以下语法组装签名字符串:
'Signature: algorithm=<algorithm>, keyVersion=<key-version>, signature=<generatedSignature>'algorithm: 指定用于生成签名的数字签名算法。支持 RSA256 算法。keyVersion: 指定用于生成或验证签名的密钥版本。默认情况下,该值为与 Client-Id 关联的最新密钥版本。generatedSignature: 在步骤 2 中生成的签名。
例如:
'Signature: algorithm=RSA256, keyVersion=1, signature=SVCvBbh5Eviwaj13ouTDy%2FAqFcNDNLXtoIgxFurTgnYjfBJ6h7jl4GKr%2Bkw8easQv9EHK7CXT9QZOMrkYNOUuqRs%2FDtT4vROCiRcnqNOKVjU3zHt%2Br%2Fxal%2FYRV4dc%2FNtu1ppyWJ6a2xNFCa63Y2YKNn%2FW%2B9eABmU2oohVXwBNoCnaLDoTIJV2RKb3E%2FiUp0aIWUz0Ntv4kVR8ZqMe6DUmf7pHRq9hm2av4wwBpJbHC%2B6R%2BMBQPv%2F0ZUFBW02ie%2FTpXBrPasb15s%2FjcmRpAnmED%2FFIec4TGzDIHr%2BO3QFtIRu72vg4zHWC3FuL4i8zfMXWNi3kp7hBFUIBpYroTZH5Q%3D%3D'- 将签名字符串添加到请求头中。有关请求头的详细信息,请参阅报文结构文档。
发送请求
构建请求时,需在请求头中添加 Client-Id 、 Request-Time 和 Signature 属性。构建好请求后,可以使用常见的工具,如 cURL 或 Postman 发送请求。以下示例使用了 cURL:
curl -X POST \
  https://open-na-global.alipay.com/ams/api/v1/payments/pay \
  -H 'Content-Type: application/json' \
  -H 'Client-Id: SANDBOX_5X00000000000000' \
  -H 'Request-Time: 1685599933871' \
  -H 'Signature: algorithm=RSA256, keyVersion=1, signature=SVCvBbh5Eviwaj13ouTDy%2FAqFcNDNLXtoIgxFurTgnYjfBJ6h7jl4GKr%2Bkw8easQv9EHK7CXT9QZOMrkYNOUuqRs%2FDtT4vROCiRcnqNOKVjU3zHt%2Br%2Fxal%2FYRV4dc%2FNtu1ppyWJ6a2xNFCa63Y2YKNn%2FW%2B9eABmU2oohVXwBNoCnaLDoTIJV2RKb3E%2FiUp0aIWUz0Ntv4kVR8ZqMe6DUmf7pHRq9hm2av4wwBpJbHC%2B6R%2BMBQPv%2F0ZUFBW02ie%2FTpXBrPasb15s%2FjcmRpAnmED%2FFIec4TGzDIHr%2BO3QFtIRu72vg4zHWC3FuL4i8zfMXWNi3kp7hBFUIBpYroTZH5Q%3D%3D' \
  -d '{
    "env": {
        "terminalType": "WEB"
    },
    "order": {
        "orderAmount": {
            "currency": "CNY",
            "value": "100"
        },
        "orderDescription": "Testing order",
        "referenceOrderId": "ORDER_ID_1685599933871"
    },
    "paymentAmount": {
        "currency": "CNY",
        "value": "100"
    },
    "paymentMethod": {
        "paymentMethodType": "ALIPAY_CN"
    },
    "paymentRedirectUrl": "https://www.example.com",
    "paymentRequestId": "REQUEST_ID_1685599933871",
    "productCode": "CASHIER_PAYMENT"
}'
处理响应
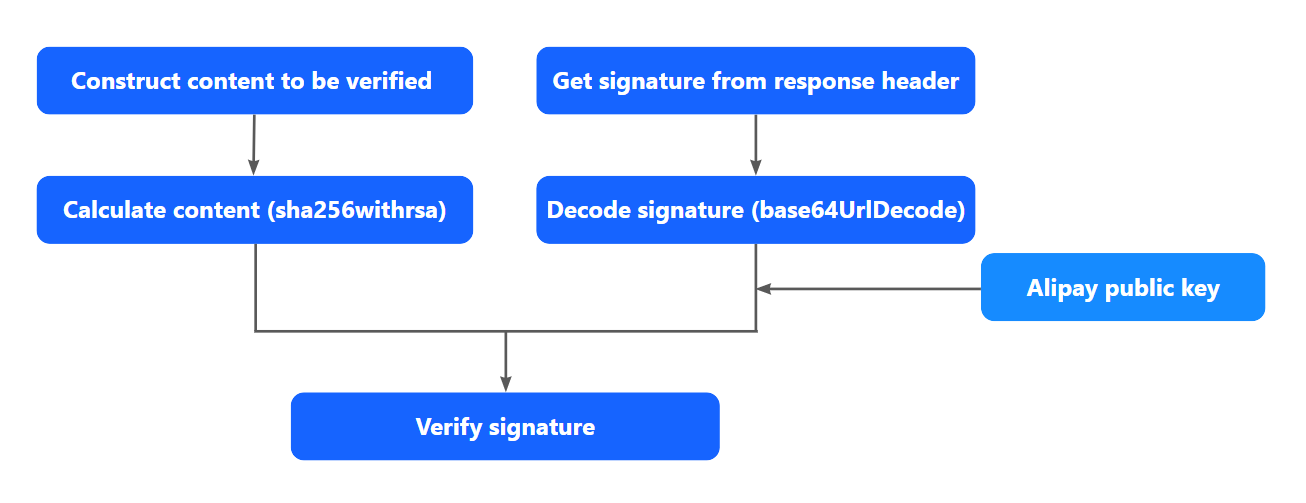
从 Antom 收到响应后, 验证响应的签名。下图展示了如何验证签名:

图2. 验证签名的方法
响应由响应头和响应体组成。 以下代码展示了响应头和响应体的示例。
- 响应头代码示例:
Client-Id: SANDBOX_5X00000000000000
Response-Time: 2019-05-28T12:12:14+08:00
algorithm=RSA256,keyVersion=1,signature=d1jdwMNkno7eOFqbsmCl2lfnmAUlK40VyHi3%2FlIrto%2FdV%2F1Ds730bfNJc9YrqNzjfb3ly66bhF0vlxgaPPwYqsWmc3FSXqSQGdSZ42VOzoZXBA2sjI0e%2F8e7IIa%2FGlrzbpNwrOiMuJxaUw6lIK7vxxyvr8vxpfQ0Pml0mKnQO2NP4yY%2BvMMJCdvmM3Bl7mNYL%2BVCLDMNespD763EY252vqMU8fbC9CUf2zCckN78TaWOuK%2FOiMlVYN8VUYIKeoyutiNUv%2B0vIiqfq7IcXCS0pom33MltFukhiyHIso3B%2FD1KN9fi0B9eJbXPB5ox%2FLsChGS48rQECRiqo2mC%2FHXzyQ%3D%3D- 响应体代码示例:
{
    "result": {
        "resultCode": "SUCCESS",
        "resultStatus": "S",
        "resultMessage": "success"
    }
}
以下步骤展示了如何使用上述示例处理Antom的响应。
步骤1:获取 Antom 公钥
通过 Antom Dashboard > 开发者 > 快速开始 > 集成资源与工具 > 集成资源 获取 Antom 公钥。
注意: 只有当你在 Antom Dashboard 上上传你的非对称公钥,你才能获取用于验证 Antom 相应响应的 Antom 公钥。
步骤2:构造待验证的内容
content_to_be_validated的语法如下:
<http-method> <http-uri>
<client-id>.<response-time>.<response-body>
-
http-method: HTTP 请求方法。值始终为POST. -
http-uri: 包括 资源路径 和 参数 (如果有的话)。例如,如果HTTP 链接是 https://open-na-global.alipay.com/ams/api/v1/payments/pay ,此字段为/ams/api/v1/payments/pay. -
client-id: 该参数在响应头中返回,用于标识客户端。一个示例值是SANDBOX_5X00000000000000. -
response-time: 此参数在响应头中返回,表示响应返回的时间。其格式遵循 ISO 8601 标准。一个示例值是2019-05-28T12:12:14+08:00。 -
response-body: HTTP 响应体。
通过遵循 content_to_be_validated 的语法规则,构建上述响应如下:
POST /ams/api/v1/payments/pay
SANDBOX_5X00000000000000.2019-05-28T12:12:14+08:00.{
 "result": {
    "resultCode":"SUCCESS",
    "resultStatus":"S",
    "resultMessage":"success"
   }
}
步骤 3: 从响应头获取签名
目标签名字符串(target_signature)可以从响应头中的 Signature 字段提取。有关响应头的详细信息,请参阅报文结构。
Signature 的代码示例:Signature: algorithm=RSA256,keyVersion=1,signature=<target_signature>
步骤 4:验证签名
验证签名的语法如下:
is_signature_validate=sha256withRSA_verify(base64Decode(urlDecode(<target_signature>), <content_to_be_validated>, <serverPublicKey>))
-
is_signature_validate: 一个布尔值,表示签名是否有效。
- true : 签名有效。
- false: 签名无效。可能的原因是私钥和公钥不匹配,或者
content_to_be_validated没有正确构建。
-
sha256withRSA_verify: 签名验证的方法。 -
base64Decode: 数字签名的解码方法。 -
urlDecode: 对 base64 解码后的数字签名进行解码的方法。 -
target_signature: 从 步骤 3中获取的目标签名。 -
content_to_be_validated: 由 步骤 2创建的待验证内容。 -
serverPublicKey: 从 步骤 1 中获取的 Antom 公钥。
以下示例代码展示了如何使用 Java 验证签名:
import java.net.URLDecoder;
import java.nio.charset.StandardCharsets;
import java.security.KeyFactory;
import java.security.PublicKey;
import java.security.spec.X509EncodedKeySpec;
import java.util.Base64;

import org.apache.commons.lang3.StringUtils;

public class SignatureSampleCode {

    /**
     * alipay public key, used to verify signature
     */
    private static final String SERVER_PUBLIC_KEY = "";

    /**
     * you clientId
     */
    private static final String CLIENT_ID = "";

    /**
     * @param requestURI      domain part excluded, sample: /ams/api/v1/payments/pay
     * @param clientId        your clientId, sample: SANDBOX_5X00000000000000
     * @param responseTime    formated time as defined by ISO 8601, sample: 2019-05-28T12:12:14+08:00
     * @param alipayPublicKey alipay public key
     * @param responseBody    response body
     * @param targetSignature signature to be verified
     * @return
     */
    public static boolean verify(String requestURI, String clientId, String responseTime, String alipayPublicKey, String responseBody, String targetSignature) {

        // targetSignature would not be present in the response when AMS returns a SIGNATURE_INVALID
        if (StringUtils.isBlank(targetSignature)) {
            return false;
        }

        // content_to_be_validated
        String contentToBeValidated = String.format("POST %s\n%s.%s.%s", requestURI, clientId, responseTime, responseBody);

        try {
            // sha256withRSA
            java.security.Signature signature = java.security.Signature.getInstance("SHA256withRSA");

            // alipay public key
            PublicKey pubKey = KeyFactory.getInstance("RSA").generatePublic(
                    new X509EncodedKeySpec(Base64.getDecoder().decode(alipayPublicKey.getBytes(StandardCharsets.UTF_8))));

            signature.initVerify(pubKey);
            signature.update(contentToBeValidated.getBytes(StandardCharsets.UTF_8));

            // urlDecode
            String urlDecodedSignature = URLDecoder.decode(targetSignature, StandardCharsets.UTF_8.displayName());

            // base64Decode
            byte[] signatureToBeVerified = Base64.getDecoder().decode(urlDecodedSignature);

            // verify
            return signature.verify(signatureToBeVerified);

        } catch (Exception e) {
            throw new RuntimeException(e);
        }
    }

    public static void main(String[] args) {
        System.out.println(verify("/ams/api/v1/payments/pay", CLIENT_ID, "2019-05-28T12:12:14+08:00", SERVER_PUBLIC_KEY, "{\"result\":{\"resultStatus\":\"S\",\"resultCode\":\"SUCCESS\",\"resultMessage\":\"success.\"}}", "d1jdwMNkno7eOFqbsmCl2lfnmAUlK40VyHi3%2FlIrto%2FdV%2F1Ds730bfNJc9YrqNzjfb3ly66bhF0vlxgaPPwYqsWmc3FSXqSQGdSZ42VOzoZXBA2sjI0e%2F8e7IIa%2FGlrzbpNwrOiMuJxaUw6lIK7vxxyvr8vxpfQ0Pml0mKnQO2NP4yY%2BvMMJCdvmM3Bl7mNYL%2BVCLDMNespD763EY252vqMU8fbC9CUf2zCckN78TaWOuK%2FOiMlVYN8VUYIKeoyutiNUv%2B0vIiqfq7IcXCS0pom33MltFukhiyHIso3B%2FD1KN9fi0B9eJbXPB5ox%2FLsChGS48rQECRiqo2mC%2FHXzyQ%3D%3D"));
    }

}
接收通知
在接收到 Antom 的通知后,验证请求的签名。验证请求签名的过程类似于处理响应部分介绍的过程。要验证签名,请遵循以下步骤:
- 获取用于验证签名的Antom公钥。
- 按照
content_to_be_validated的语法构建要验证的请求:
<http-method> <http-uri>
<client-id>.<request-time>.<notify-body>- 从请求头中获取签名。
- 验证签名。
